September 29, 2010
Tuesday Treats Tutorial
Welcome to the Thursday edition of Tuesday Treats!! I'm so excited to share my project with you! This is only my second video that I have ever made so hopefully you will give me grace for my imperfections! :-)
We've all seen the beautiful die-cut papers in the stores but if you're like me, you don't want to pay $2-$3 for one page! In this video, I show you how you can make your own with your Gypsy! It's really quite easy and produces beautiful results! Feel free to leave me a comment if you have any questions or just to let me know if this video helped you in any way! I am hoping to have the gypsy file for this project up on my blog in the next day or two so stop on over to my blog: www.javajencreations.blogspot.com and visit me there! Thanks for stopping by here and have a wonderful day!
Java Jen
September 28, 2010
Sand Pail Mini Album....
Hello everyone. My name is Ronnie and I have the honor of sharing with you a project created with Life's a beach, the cartridge of the month. I hope you like it.

Supplies needed
Cartridges….Life is a beach/Alphalicious/Doodle Charms
Papers of your choosing, some solids, some pattern..I am using a pack from Club Scrap..
Adhesives + red line double sided sticky tape
Ink Pads (browns for the sand, and colored to match your papers)
Embossing folders
Glimmer mist
Beach buttons
Ribbons and fiber to match papers
Clip it with coordinating clips
Stapler with beach themed staples
Beach themed die cuts to embellish with

To make this album, happily get your "G" turned on and ready to roll. For the base page you will need 2 of the sand pails on your screen, both the same size. In 1 set you will use the hide contour to hide everything except that little pile of sand. And on the other hide everything but the pail. You then need to arrange the sand pile onto the top of the pail and weld it there. It is gonna look like a bunch of goobly-goo but it will be ok, once you hit the preview button all you will see is a cute little pail filled with sand. This then becomes your base pages for your mini album. The rest is easy after that.

So know you have your base page all set to go, now you can do the same thing for all the different parts of the pail, using hide/contour on all the different levels of the book and pages. The finished book will be 5x7.
 So now I normally cut 1 page and set of page elements just to make sure that everything has stayed the size and in the spots I welded them. Once I know all that stayed the same, it is time to cut your base pages as many as you would like. Then start cutting your papers to make the base pages complete.

 Once I have my base pages inked, chalked, misted and adhered, it is time to move on to the embellishing. On each page I did the sand dunes on the page bottom, just to keep with theme and it is a great place for extra embellies.
 I used a variety of embellishing tool, and extra die cuts. Fibers, and ribbons, cute little sea shells, sand dollars, and star fish. A title, some clip its, die cuts from cricut, a photo mat and it is ready for a photo

 I hope you enjoy the mini album. The file was also created in CDS as well as Gypsy, for those who do not have the "G"
http://www.4shared.com/account/dir/e1Yj0I3S/sharing.html
¸.•-:¦:-♥•*´¨) ¸.•*¨)
(¸.•´ (¸.•´HUGS *¸.•´¸.•*´¨)
(¸-:¦:-♥(¸.•´ *Ronnie.•*´¨ ) ¸.•*¨) -:¦:-♥
♥.•*¨-:¦:-. ;.•.♥.•*¨-:¦:-. ;.•.♥

Supplies needed
Cartridges….Life is a beach/Alphalicious/Doodle Charms
Papers of your choosing, some solids, some pattern..I am using a pack from Club Scrap..
Adhesives + red line double sided sticky tape
Ink Pads (browns for the sand, and colored to match your papers)
Embossing folders
Glimmer mist
Beach buttons
Ribbons and fiber to match papers
Clip it with coordinating clips
Stapler with beach themed staples
Beach themed die cuts to embellish with

To make this album, happily get your "G" turned on and ready to roll. For the base page you will need 2 of the sand pails on your screen, both the same size. In 1 set you will use the hide contour to hide everything except that little pile of sand. And on the other hide everything but the pail. You then need to arrange the sand pile onto the top of the pail and weld it there. It is gonna look like a bunch of goobly-goo but it will be ok, once you hit the preview button all you will see is a cute little pail filled with sand. This then becomes your base pages for your mini album. The rest is easy after that.

So know you have your base page all set to go, now you can do the same thing for all the different parts of the pail, using hide/contour on all the different levels of the book and pages. The finished book will be 5x7.


http://www.4shared.com/account/dir/e1Yj0I3S/sharing.html
¸.•-:¦:-♥•*´¨) ¸.•*¨)
(¸.•´ (¸.•´HUGS *¸.•´¸.•*´¨)
(¸-:¦:-♥(¸.•´ *Ronnie.•*´¨ ) ¸.•*¨) -:¦:-♥
♥.•*¨-:¦:-. ;.•.♥.•*¨-:¦:-. ;.•.♥
September 16, 2010
Family Walk on the Beach Layout

Hello, this is Mila from Milamemories.blogspot.com. I am so excited to be your guest designer on Tuesday Treats today. This is a super simple layout i did of our Florida vacation last year. I used the Life's a Beach cartridge to weld the title together and I used the French Manor Cartridge for the flourish. I love the flourishes on that cartridge. For the title and the flourish i distressed them with Tim Holtz distress ink. I used gold paint around the edges of the photos, i really thought that it made the layout look very elegant. I really tried to make this layout girly, because as most of you know i have a boy, so most everything i do does not include pinks and purple's. So for this layout i went all out and wanted to use different shades of pink, because i was in the photo (usually i am the one behind the camera) i felt like i could make it girly and pinklicious (I know that is not a word LOL) . I used a ton of Prima flowers and of course Prima bling (I can not do a layout without it). Hope you like it!!
Feel free to leave a comment and let me know what you think!
Hugs,
Mila
Milamemories.blogspot.com
September 9, 2010
Big Boy Aiden

 Well hello, Sheila here from Shes A Sassy Lady and it seems like such a long time since I was here at Tuesday Treats. It's just been a busy, busy month, imagine that! You know we all lead such busy lives that it feels so good to just close the door and let your imagination go crazy and just have fun with a layout. So once again I didn't follow Pam's guide lines and went outside of the box. You see, I was just in Chicago for my little Carissa's 6th birthday and in the midst of the party and all the goings on was our little1 year old Aiden. He was so happy and ever so busy with his little toys that I just had to do this page - his way. I didn't know what I was going to do until Friday came along and the wonderful ladies at Stuck On U Sketches challenged us with this wonderful sketch... and once again I was out side the box. You see flowers, I see toys.
After designing the page on My Gypsy Woman I went hunting for just the right papers. I choose My Minds Eye, Twinkle Twinkle little boys stack and I love the sparkle it added. I then got out the scrap box and just used scraps for the toys.

Here is a close up of the background paper. The little brown squares made it possible for me to sent the rhinestones on this pastle paper.


I then turned to all the little toys and got them ready. First I chalked.

Then I inked and put together.

Until I had all my little toys together. I didn't get complex on the little toys becasue they weren't complex, they were just simple little plain line toys for a 1 year old boy.

I then added my rhinestones.

And placed my little toys around the photos.


Isn't that just too cool? Aiden't little world is one filled with joy and imagination and wonder. What a great place to visit.

This is a close up with all the little toys.
And the completed page. How much fun is that? See sometimes you just got to go the fun route. I would like to add that this sketch is perfect for Home Decor, Home Accents and Accent Essentials, but the toys were a better choice for my little Aiden. I sure hope you enjoyed today's project.
Thank you for your sweet words of incouragement, as they continue to inspire me to keep sharing with you.

September 7, 2010
Home Tweet Home

Hi everyone! This is Elizabeth from 217 Creations and today I am your guest designer. I love using my Gypsy and Cricut to alter unfinished items. This whole project cost less than $2.00 to make and will be a great present for my mom's birthday.

I started this project with an unfinished wooden birdhouse. I bought it at Michaels for 10 CENTS! I painted it with Gold Acrylic paint. I chose to one do one layer so it would not look too metallic for the project.
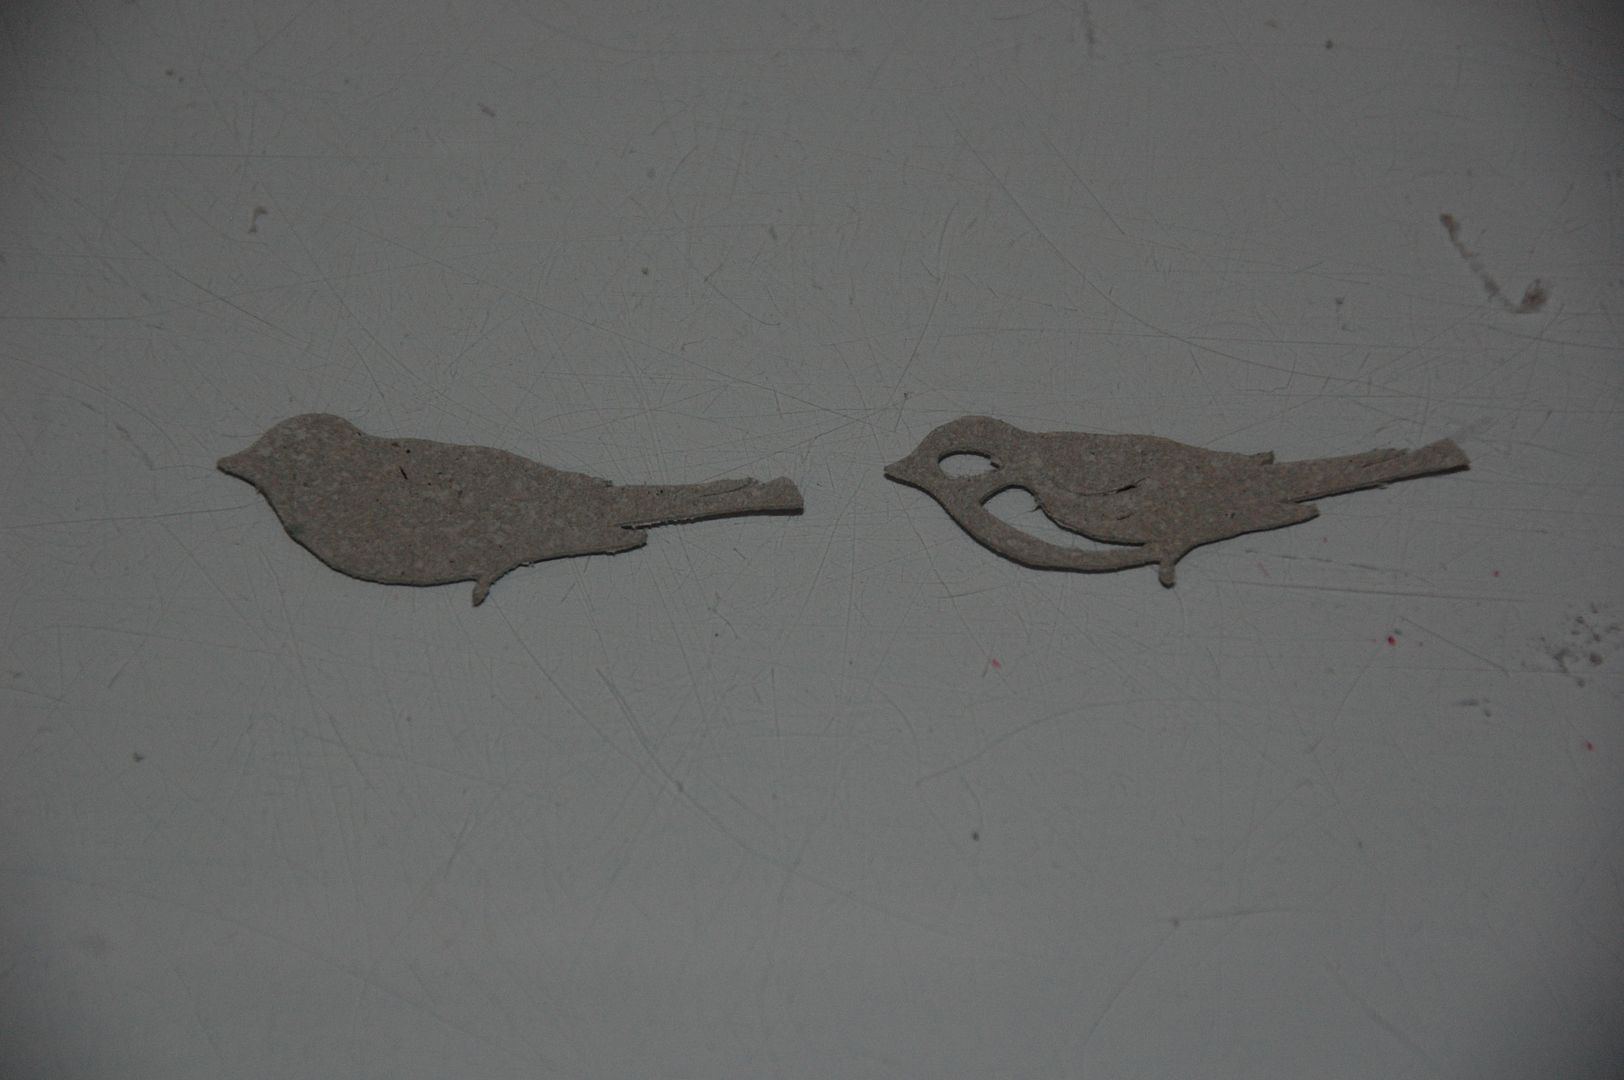
While that dried, I used my Gypsy to choose the bird from Home Decor. I cut the bird and its blackout at 1.35 inches from Grungepaper. The settings I used were Depth 6, Pressure High, Multicut 2.
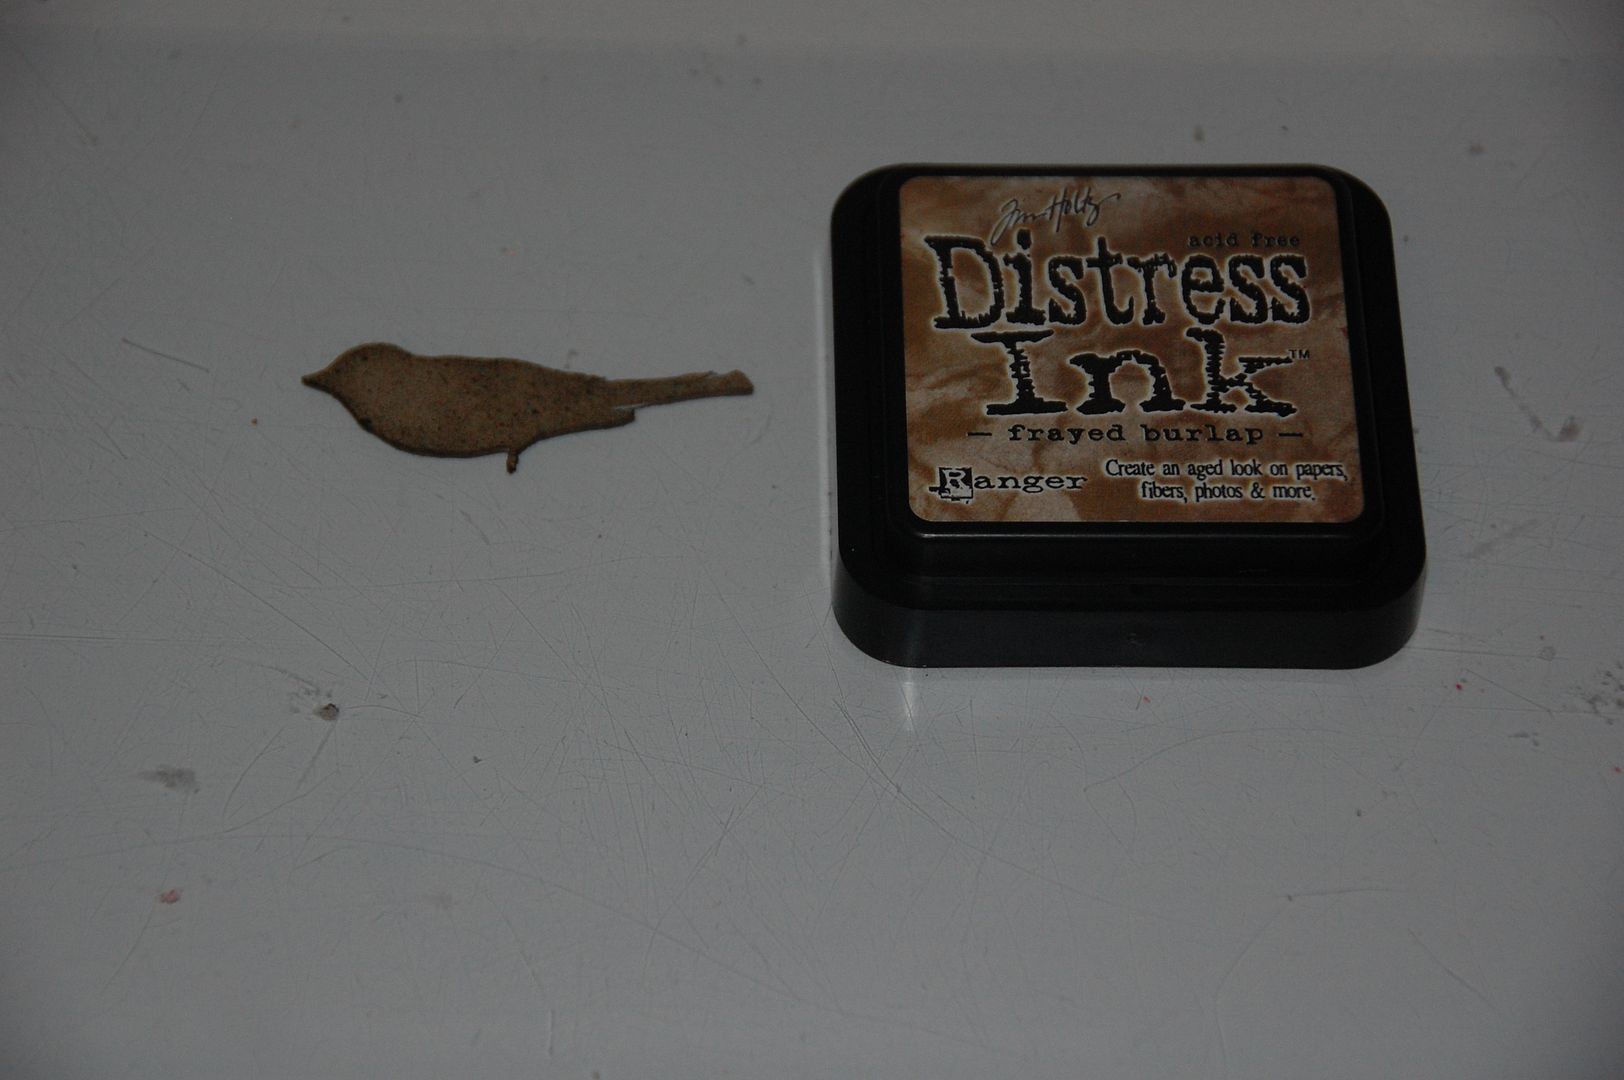
I started with the blackout. I inked it with Tim Holtz Distress Ink in Frayed Burlap. I let it set for a bit.

Then I took Tim Holtz Distress Ink in Crushed Olive and taopped it into the Frayed Burlap.

Once the inks were dried, I took a small fan brush and lightly applied a thin layer of tattered Angels Hay Ride Glimmer Glam.
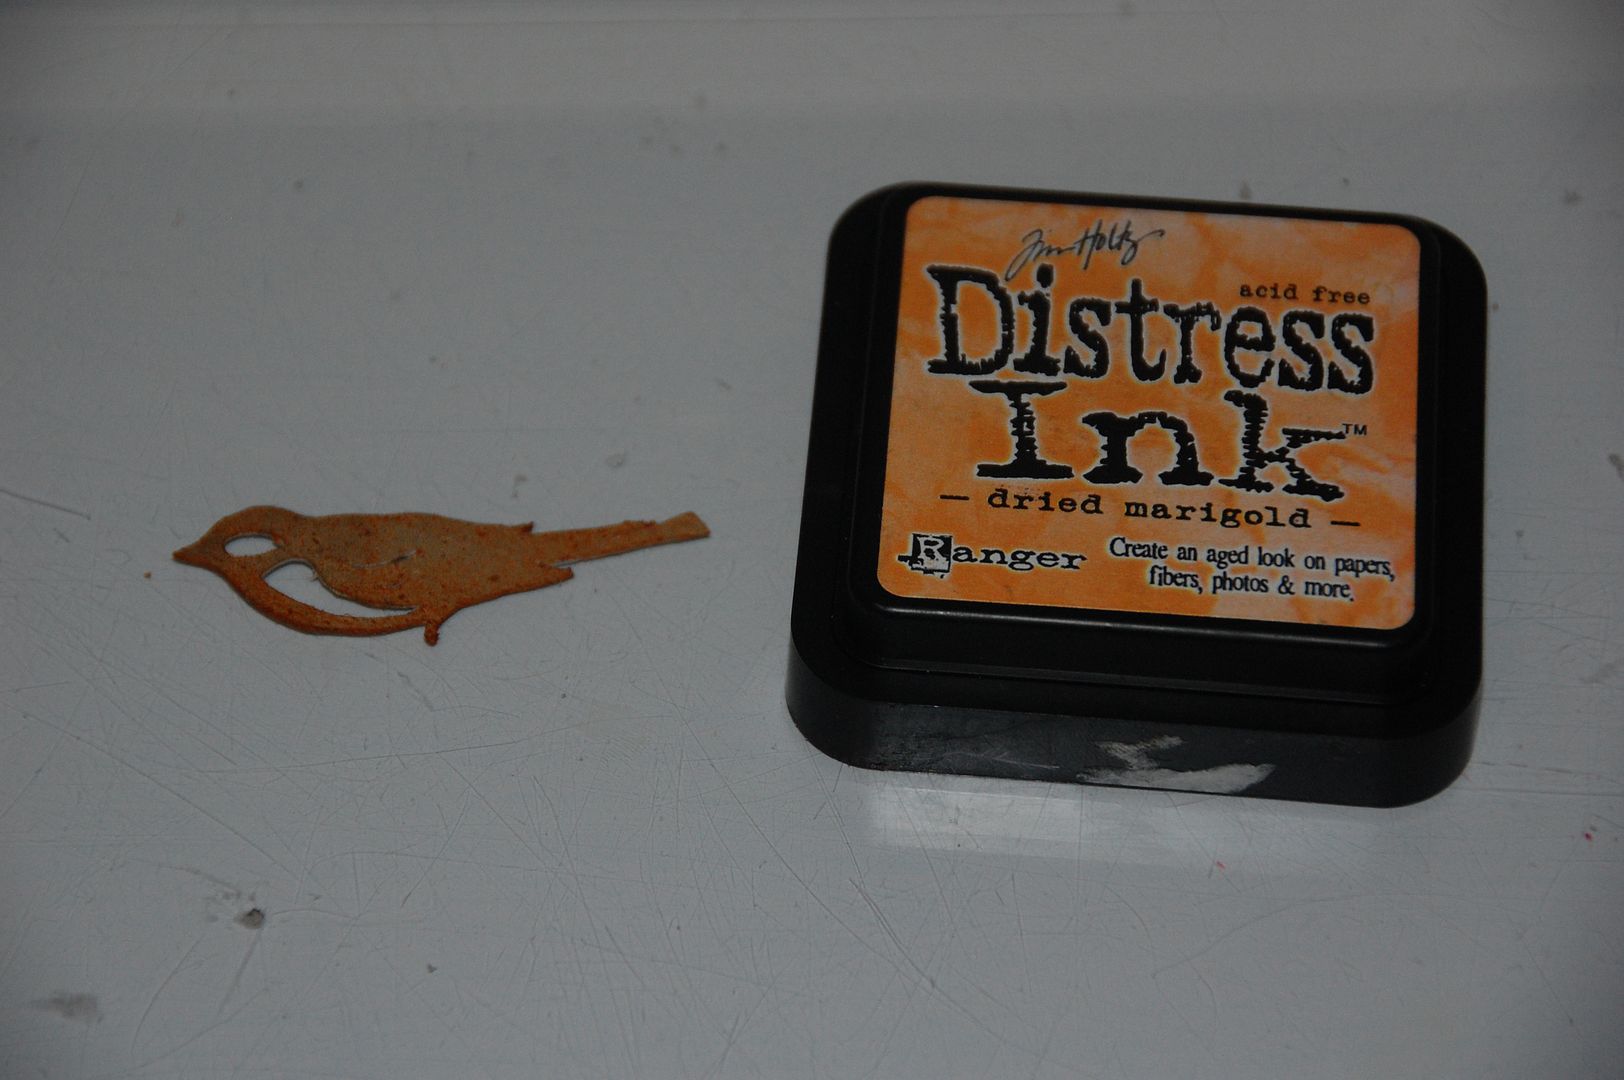
Next I inked the top layer. I used Tim Holtz Distress Ink in Dried Marigold. While it was still damp I tapped some Distress Embossing Powder in Walnut Stain into the wet ink.

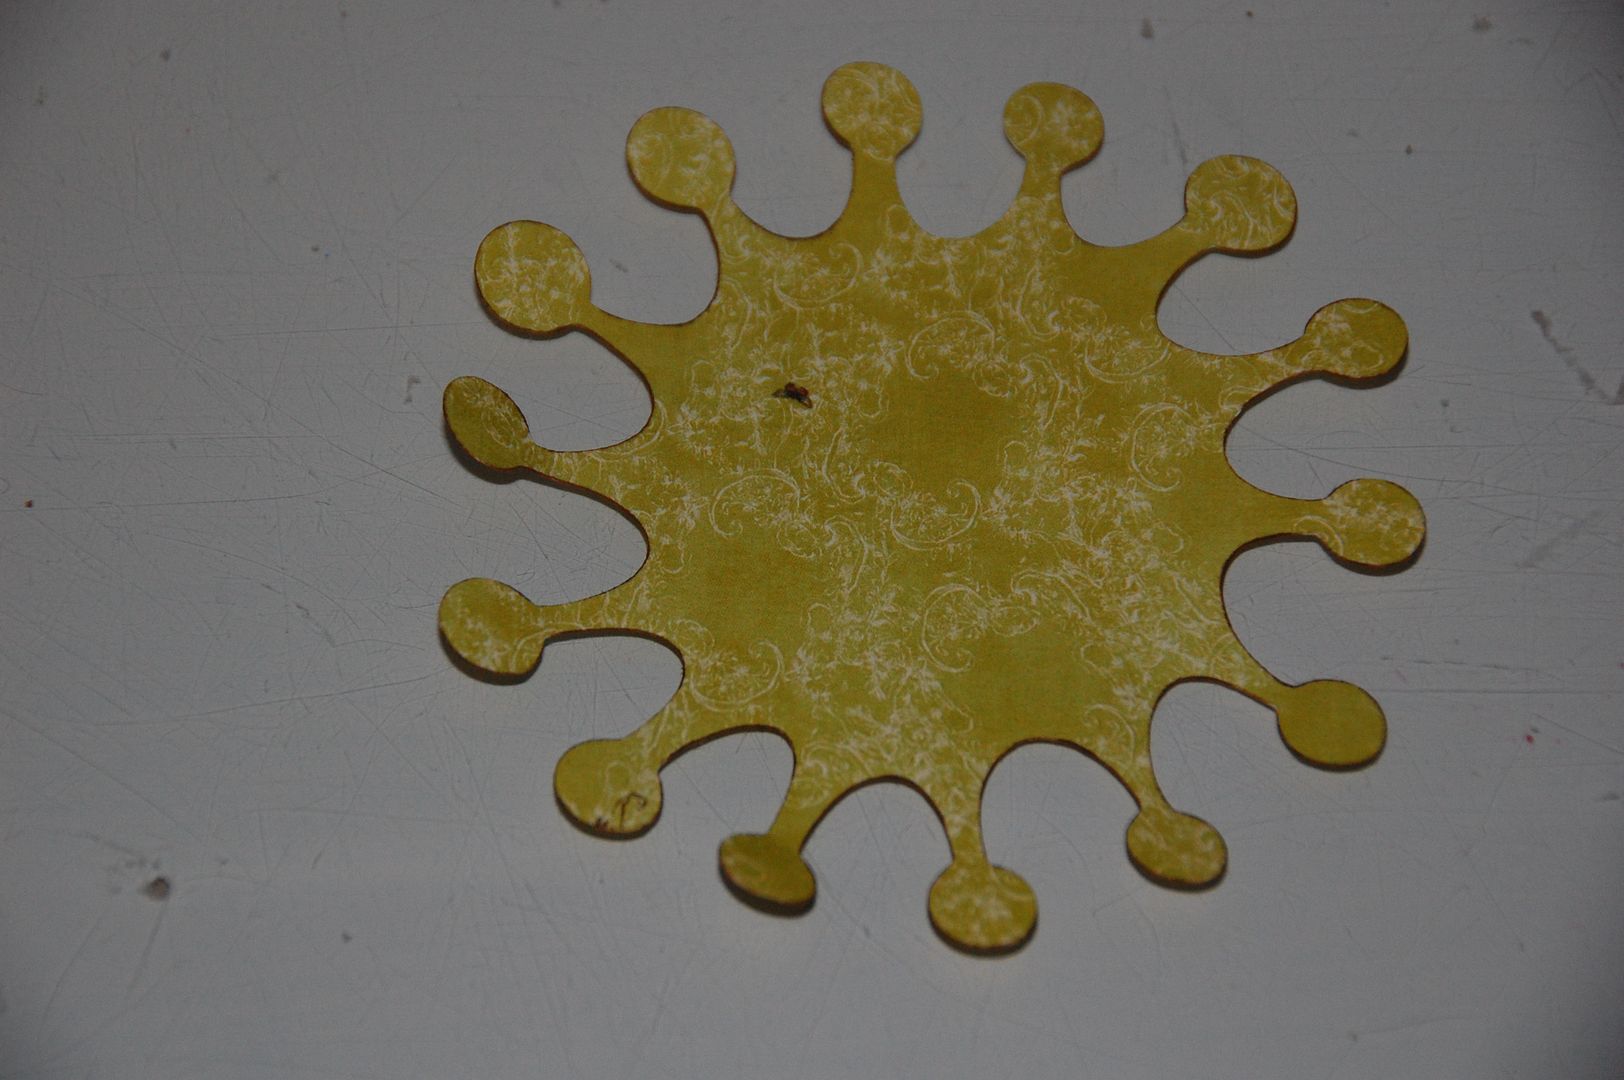
Next I cut the spiky looking flower from Accent Essentials at 4.18 inches. I used Hide Selected Contour on my Gypsy to remove the center cut. I cut the design from both chipbboard and paper. I painted the chipboard with a muted golden yellow and I inked the edges of both the paper and the chipboard very lightly with Fantastix Color Box Chestnut Roan Ink. (If you want to see the video on how to ink like this Inking Die Cuts ). The paper is Webster's Pages Life Beautiful.
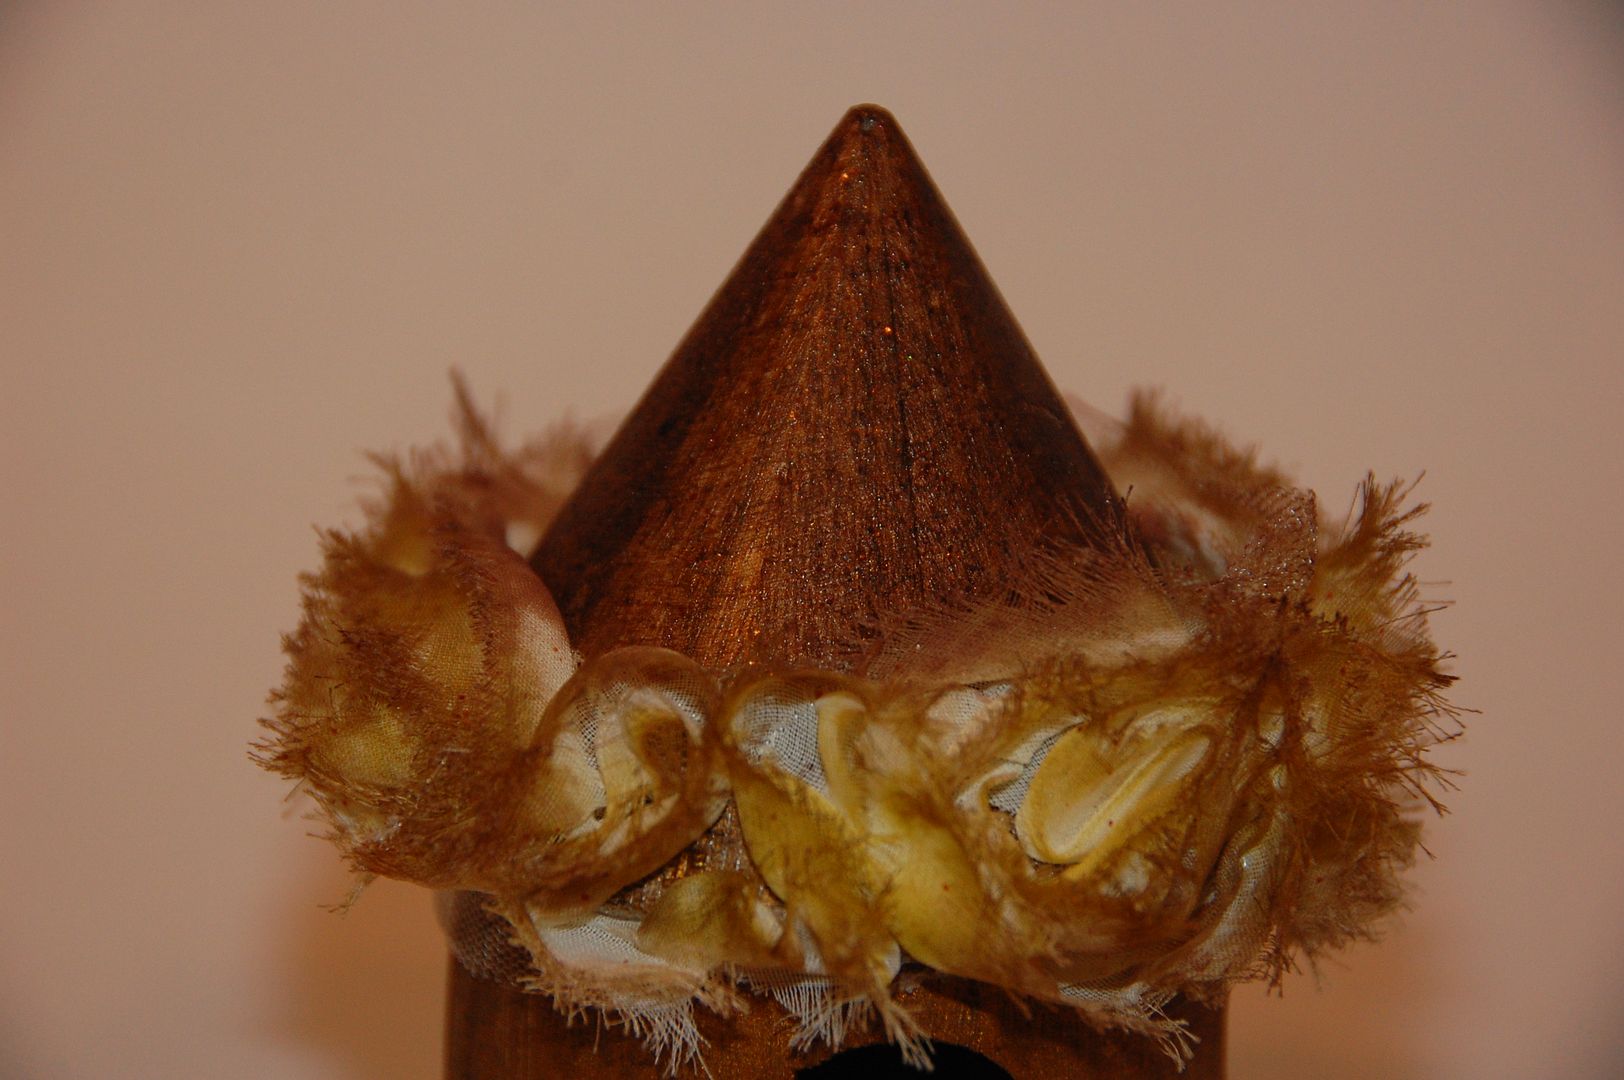
To give the roof a more distinctive look, I painted a thin layer of Tattered Angels Glimmer Glam with a fan brush. I used Espresso Bean. Then I took some Raveled Rosette trim and hot glued it to the edge of the roof. Tis ribbon started out cream, which was to stark. So I used Tim Holtz Distress Ink in Crushed Olive, Frayed Burlap, and Tea Dye.
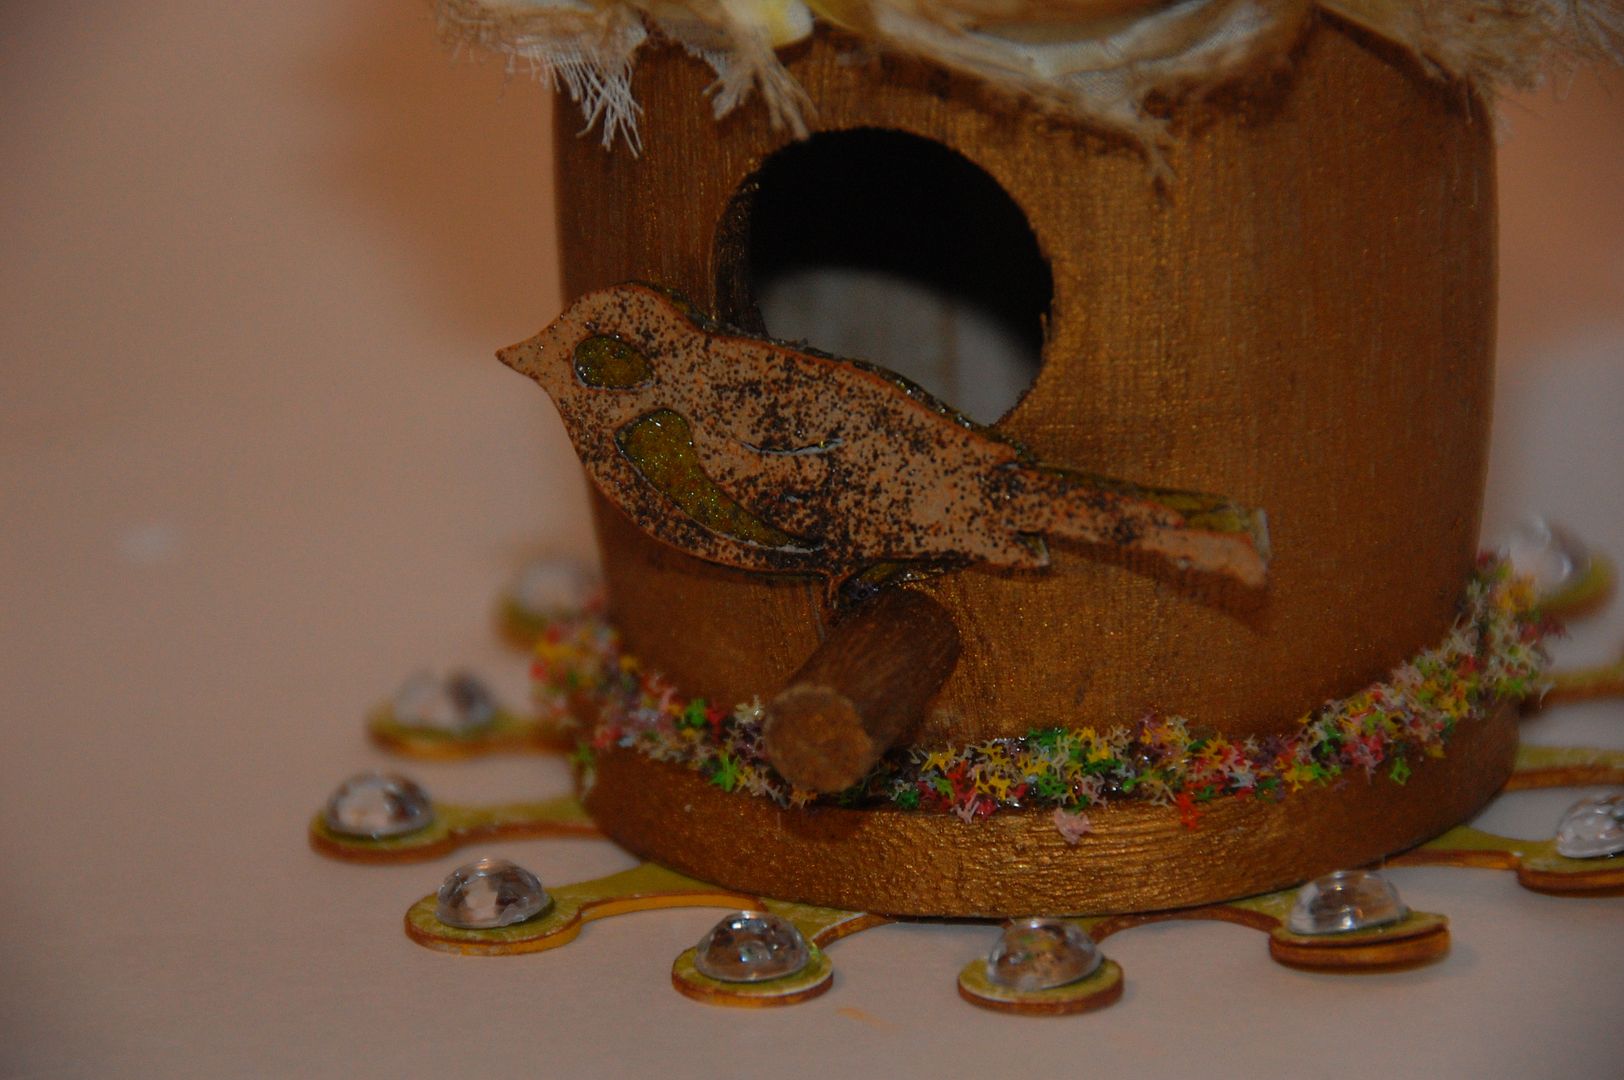
I hot glued the wooden birdhouse to the base of the spiky flower and added rhinestones to each point. Then I took a small thin layer of hot glue to the base and sprinkled Spring Flower Soft into the hot glue. Finally I added the bird to the perch.
I love how it turned out. If you are interested in the file, please visit my personal blog at 217 Creations.Thank you comment and following us here at Tuesday Treats!


September 2, 2010
Relaxing Mermaid!
Hello there!
This is Pam from TheBugBytes
Summer is nearly gone and so is Water Time for some! Now we need to catch up and scrap those photos.
So here is my way of doing it. Mya and me started this Cartridge of the month thing to explore cartridges. I am finding that I have a love-hate relationship lol. Sometimes it is confining and I do want to do something different. This time it is love as Life is a Beach fits in quite nicely.
Since I wanted more than one photo in the layout and also because I was requested to do a tutorial with one I decided to make the photomat an accordian style. This choice gave me lots of room to play inside the layout

Sometimes I have the paper to start with and sometimes or rather most of the times the focal photo to begin But this time since I had no focal point photo - I designed on my Gypsy first with only one idea - that the main color theme would be blue.. Let's take a look at the G
Here is the layout which I will not cut. Just helps me size images and gives me an idea.

I prefer to cut most shapes from beige or white cardstock as I can color them however I want and is very helpful in cutting small images. Easier than assembling all the tiny layers. I prefer beige/cream/sand colored cardstck as they start of a little neutral tone and easier to go in any direction unless of course I need white in large quantities and do not want to use opague white then I lean on white.
I stock sand cardstock, white and black and also vellum from company called paper and more. Their cardstock cuts very well. I order this online along with vellum.
So here is page 2 - I named it mermaid. Sometimes I name by main theme and sometimes by color of the paper. I put the main items in and some shells , corals, fishes etc as much as could fit in so that I could pick and choose some pieces later

Then for the embellishments - photocorners on the photomat I decided I wanted a pattern paper. At this stage I had no clue as to the color. (Later while assembling you'll see that I liked it much better on the photomat front itself than marking the accordion photomat.

Most of the times when you weld the insides dissappear. See my reclaiming insides video - http://www.thebugbytes.com/2010/07/gypsy-video-reclaiming-insides-of-some.html
I just copy the image to another layer - unweld the group -, hide the outer contour and paste it back on the page. Then since gypsy does not paste it in same place (which is good. Let it be as far apart as possible) and also since it is difficult to select the image later when they coincide I first group both. Be careful to have them as far as apart as possible t make life easier on you.
Then note the x and y axis of the each piece in the welded image ( ie purple) and then set the x and y axis of the the corresponding hidden contoured image(again select and make just that piece purple) to the same number. Work your way till all the images are grouped. When you check your weld it should now show half yellow. Press preview and you can see that the outine is red for welded and insides show black. Great now both will cut.
Next I wanted a leaf border around the page. Instead of doing the corners in a square I just decided to do each sides so that I can paste it on the page

I used the splish splash word which is predesigned in a cartridge - I think splish splash lite and I wanted a label so decided so I adjusted the width and height after unlinking the golden chain and playing till they fit the words - splish splash.

Here are all the cartridges used

Now for assembling.
I took the cuts an really played with them- chalking, copic, pencils etc to color. Then I added Glossy Accents to some and after it dried even sticked further .I also embossed the mermaid (silver) in places by using zig embossing marker.
Here are some close ups
The mermaid

The tree and bird. I just had fun with the bird. Guess I invented a new species lol as I am sure the original bird might not sport the same color as mine does. ;)

 Corals and label

The fishes

Now for the sea and beach sand I took some patterned papers and tore them to show the white. The trick in getting the whites is to tear the opposite side of the paper ie the paper where you do not want the white - towards you

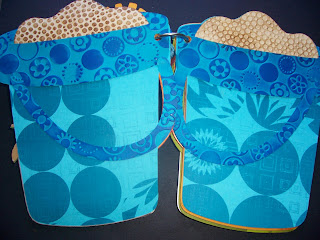
Now for the accordian mat itself.

opened

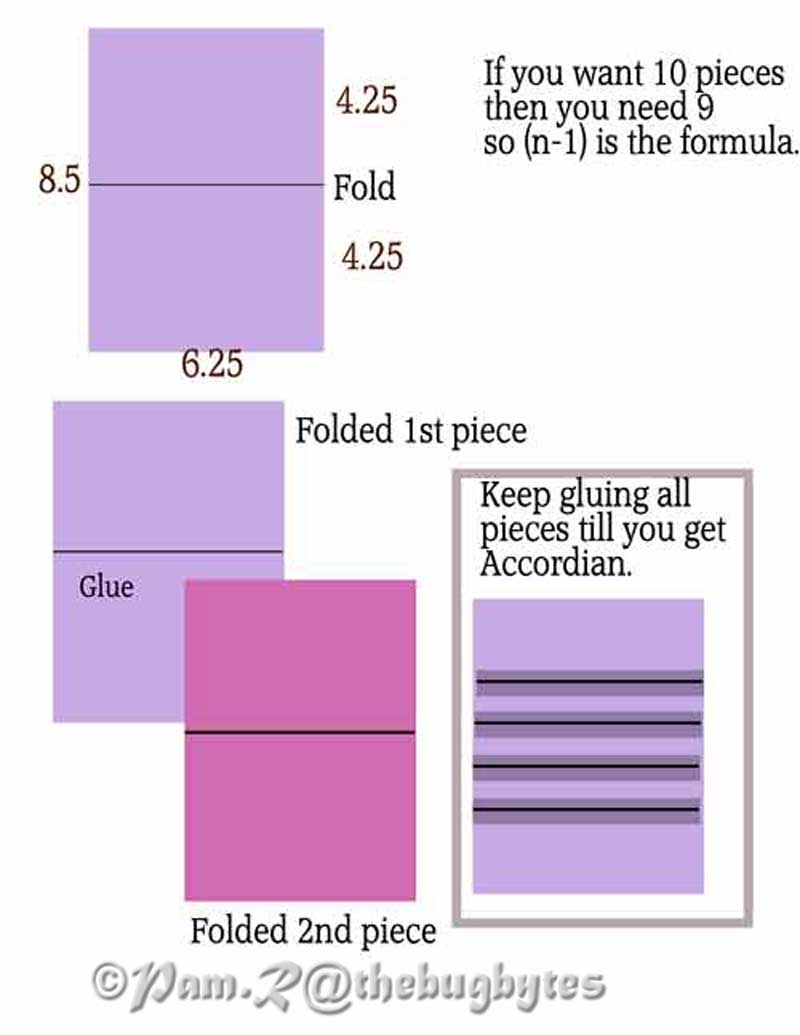
Now for the accordian - if you do not want to decorate the top like I have done and want to put a photo there - the number of pieces you cut is ( number -1 ie n-1)
Take one side of the otherwise single mat and double it . For eg since I have landscape type photos and I want it to open that way too - single mat would be 6.26x4.25. I doubled 4.25.
Here is instruction on assembling which might make it a bit clearer

So here are pics
score both valley and mountain. ie on both sides as you do not know which way the piece is going to fold in the accordian.

glue

place

and once all is glued and assembled - fold and get this

not the dog but the accordion :). He is a shadow fox always shadowing me.
Well that's it - A Lon..........g IT I guess :).
Hope you enjoyed it. See you again tomorrow at Sassy or The Bugbytes as it my turn designing at Sassy's.

This is Pam from TheBugBytes
Summer is nearly gone and so is Water Time for some! Now we need to catch up and scrap those photos.
So here is my way of doing it. Mya and me started this Cartridge of the month thing to explore cartridges. I am finding that I have a love-hate relationship lol. Sometimes it is confining and I do want to do something different. This time it is love as Life is a Beach fits in quite nicely.
Since I wanted more than one photo in the layout and also because I was requested to do a tutorial with one I decided to make the photomat an accordian style. This choice gave me lots of room to play inside the layout

Sometimes I have the paper to start with and sometimes or rather most of the times the focal photo to begin But this time since I had no focal point photo - I designed on my Gypsy first with only one idea - that the main color theme would be blue.. Let's take a look at the G
Here is the layout which I will not cut. Just helps me size images and gives me an idea.

I prefer to cut most shapes from beige or white cardstock as I can color them however I want and is very helpful in cutting small images. Easier than assembling all the tiny layers. I prefer beige/cream/sand colored cardstck as they start of a little neutral tone and easier to go in any direction unless of course I need white in large quantities and do not want to use opague white then I lean on white.
I stock sand cardstock, white and black and also vellum from company called paper and more. Their cardstock cuts very well. I order this online along with vellum.
So here is page 2 - I named it mermaid. Sometimes I name by main theme and sometimes by color of the paper. I put the main items in and some shells , corals, fishes etc as much as could fit in so that I could pick and choose some pieces later

Then for the embellishments - photocorners on the photomat I decided I wanted a pattern paper. At this stage I had no clue as to the color. (Later while assembling you'll see that I liked it much better on the photomat front itself than marking the accordion photomat.

Most of the times when you weld the insides dissappear. See my reclaiming insides video - http://www.thebugbytes.com/2010/07/gypsy-video-reclaiming-insides-of-some.html
I just copy the image to another layer - unweld the group -, hide the outer contour and paste it back on the page. Then since gypsy does not paste it in same place (which is good. Let it be as far apart as possible) and also since it is difficult to select the image later when they coincide I first group both. Be careful to have them as far as apart as possible t make life easier on you.
Then note the x and y axis of the each piece in the welded image ( ie purple) and then set the x and y axis of the the corresponding hidden contoured image(again select and make just that piece purple) to the same number. Work your way till all the images are grouped. When you check your weld it should now show half yellow. Press preview and you can see that the outine is red for welded and insides show black. Great now both will cut.
Next I wanted a leaf border around the page. Instead of doing the corners in a square I just decided to do each sides so that I can paste it on the page

I used the splish splash word which is predesigned in a cartridge - I think splish splash lite and I wanted a label so decided so I adjusted the width and height after unlinking the golden chain and playing till they fit the words - splish splash.

Here are all the cartridges used

Now for assembling.
I took the cuts an really played with them- chalking, copic, pencils etc to color. Then I added Glossy Accents to some and after it dried even sticked further .I also embossed the mermaid (silver) in places by using zig embossing marker.
Here are some close ups
The mermaid

The tree and bird. I just had fun with the bird. Guess I invented a new species lol as I am sure the original bird might not sport the same color as mine does. ;)


The fishes

Now for the sea and beach sand I took some patterned papers and tore them to show the white. The trick in getting the whites is to tear the opposite side of the paper ie the paper where you do not want the white - towards you

Now for the accordian mat itself.

opened

Now for the accordian - if you do not want to decorate the top like I have done and want to put a photo there - the number of pieces you cut is ( number -1 ie n-1)
Take one side of the otherwise single mat and double it . For eg since I have landscape type photos and I want it to open that way too - single mat would be 6.26x4.25. I doubled 4.25.
Here is instruction on assembling which might make it a bit clearer
So here are pics
score both valley and mountain. ie on both sides as you do not know which way the piece is going to fold in the accordian.

glue

place

and once all is glued and assembled - fold and get this

not the dog but the accordion :). He is a shadow fox always shadowing me.
Well that's it - A Lon..........g IT I guess :).
Hope you enjoyed it. See you again tomorrow at Sassy or The Bugbytes as it my turn designing at Sassy's.
Subscribe to:
Posts (Atom)