Knowing is not enough; we must apply! - Johann Wolfgang Von Goethe

Welcome & Copyright & Disclaimer

Welcome to Tuesday Treats. Hope you have a pleasant journey browsing and getting inspired by the projects you find here. We appreciate and treasure your comments so please leave us some blog love and comments. But before you start your journey here just a small note . Do please read and then you can continue on. Copyright: This blog has a many designers showcasing their projects. Please look up their individual site to check their copyrights for any infringements. My files & projects are also all copyrighted. They can be used as inspiration and for personal gifts only but cannot be used in classes, in magazines or for contests. Please look in the side bar for more details on the copyright. Disclaimer: The designer's designs belong to them and them only & not to TuesdayTreat and The TuesdayTreats will not be responsible or liable in any way for any results or consequences from those designs.

August 31, 2010

Life is a Beach....Seriously?!?!??!?


Hi Everyone!! Myamagoo here after a very long hiatus.....how have you all been?!?!?
 
I'm so glad Pam let me come back after being away for so long.
 
My goodness!! After seeing all the fabulous work from all of our designers I'm not sure I'm even needed anymore (this is meant as a compliment-the projects have just been simply outstanding!!).

My Task if I chose to accept it - is LIAB aka: Life is a Beach. I recall all the hoopla over this stinkin' cart and missing images...yada yada....I bought the cart....AND NEVER EVER USED IT! Gasp! This is the very first time I've made something with this cart....so I'm super happy today about that!


You all know I'm mainly card based...rarely try anything outside of the box...so....ANOTHER card from moi!      (I saw that yawn! hey!)


p.s. my camera battery died, had to use hubby's camera....I hate this little point and shoot thing....sorry the pics aren't as clear and sharp as the could be :(


I used 3 beautiful flowers from this cart....I circled in yellow the layers I used as well.


For the layers (the inside parts of the flower) I used Hide Contour function on Gypsy so I could cut out the insides using different patterned paper and placed it in different areas on my Gypsy Mat.


This is a Photo of the base of the card cut out on my mat...I GROUPED the 3 flowers together...and then added a rectangle - grouped it to the flower group. Then I pushed my weld button and VOILA!


Then I got out my MS score board and GENTLY scored the small areas that attach to the base so they fold easily.


Once I had all my flowers cut out, I tried Dry Fitting them to see how I wanted it to look. I ended up liking having the center flower be the focal point. Then as you can see I picked out some matching glitter - BRING ON THE BLING!!


The all time easiest and BEST way to put glitter on your cuts is to use a xyron machine.  I have the little X one and this larger guy.  I forgot I had the smaller one and remembered only after I had started running my cuts through! argh :)  Once you have run it through, rub your fingers over it to adhere the glue a little bit more.  Then peel off the back and you are left with a very sticky cut.  Grab your Glitter and Pour!


After I pour the glitter all over, I get a clean piece of paper and gently push down on top of my cut while all the glitter is still on. This pushes the glitter onto the paper without getting it all over your fingers. Then you can just bang your shape on the table and it's just so pretty!!!


The rest of the glitter cuts (the flower stems) all finished.


Don't forget to ink the edges of the rest of your flowers :)


Seeing as I wanted the center flower to be the focal point, I thought I should use pop dots and get some dimension going on.


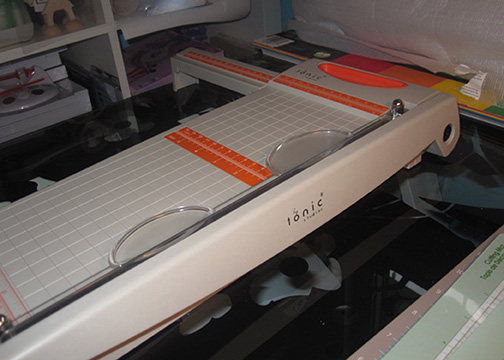
Random photo of my newest and most favorite craft tool!! Cuts like butter and straight as an arrow EVERY TIME!!! I'm in Love! :) :)


And Now for the card all finished ~ I really hope you like it!


forgot to show you all what it looks like open....and I haven't the faintest idea of what I should put on the inside! :)


So great to be back here at Tuesday Treats!!!
See you all Next Month!!

~MAGOO~

oh! I used American Crafts Paper (Let's Play)...it cuts so amazing! 
File will be available for download on my blog when I get home from work today....my G is officially out of juice and happily charging away right now :)

August 25, 2010

Just Like Daddy 2-Page Layout


Hello Everyone, it's Mila from Milamemories.blogspot.com. I am so excited to share this quick and easy two page 12x12 layout. I got the base of this layout from sketchythursdays.blogspot.com, they are a great blog to get sketch ideas. This would even work on a mini album. The cartridge I used was Life's a Beach, I use this one very often for our vacations, so i was extremely excited that we got to explore it on Tuesday Treats this month. I had some wonderful pictures of my son and husband together. In one of the pictures which is a 5x7 photo my son was standing the exact same way as my husband and they even had the same facial expression. It was just so precious I had to scrap it. We were on the beach in Florida, which is one of my favorite places.

The paper collection i used for the base of the layouts was by K & Company Sea Glass and I cut out a few images from Graphic 45 Boardwalk collection. I inked most all of the edges with Vintage Photo distress ink by Tim Holtz. I used some rubons from Making Memories for the title and added some Prima bling to the pages (LOVE IT!!), I tried for the bottom to look like sand since the photos are of my husband and son on the beach together. Lastly, I put a Tim Holtz border strip along both pages and then cut it in half, I really like the way it turned out. Below are some close ups of the layout.


Please feel free to leave comments and let me know what you guys think. Hope you like it!! I will upload the file for this layout including all the measurements on my blog by tomorrow late night.

Thanks for looking,

Mila

August 24, 2010

Fun and Easy Cupcake Box!

Hey everyone, my name is Kimberly and I am so excited to share this project with you!  Be sure to stop by My Craft Spot for more fun projects and vidoes!  I don't have the 'Life's a Beach' cartridge, so I decided to use George and my Gypsy.

This box was soooo fast and easy to make! You can download the free gypsy file on my blog! Just click on the 'cut files' tab and download the file (3" Box).


 Be sure to watch the video to see how I put it all together!


Have a great day!

August 19, 2010

Life is a Beach Inspired Project

Hi Everyone!  It’s Wini from LooneyBugDesigns here with your inspiration for the day.
Orchid 7 
As much as I love this months cartridge Life is a Beach (LIAB), for some reason I do not own it yet.  Even though it is on my list of cartridges to get, there are others that I want more so I decided not to go out and get it right now.  Instead I turned on my Gypsy and started looking over the images on LIAB for inspiration.  I loved the Orchid Image and decided I would use that as my inspiration.
Next I needed to pick an Orchid type flower from a cartridge that I do have.  I decided to use 50 States since it has so many different flowers and found one that I liked.  I placed 4 flowers and the matching layer on a mat on my Gypsy and used my favorite feature Hide Contour to erase all the parts I didn’t want.  I LOVE THIS!  Here is a picture of my Gypsy Mat all ready to cut.
Orichid 1
Now why did I use 4 flowers?  Because that is how many fit on the paper that I was planning on using.  No other reason then that.  I cut them out of white paper so that I could color them with my Copics any color I wanted.  I love to start with a blank canvas.
Orchid 2
I airbrushed the Leaf on all 4 of the bottom layers (I only ended up using 2 of the bottom layers but I colored all I had in case I made a mistake – and besides it is so fun to airbrush! I ended up using 3 colors of green and a hint of pink on the leaves.
Orchid 3
Next it was time to color the flower layers.  I airbrushed the tops and backs of all the flower layers so that I could curl them up and add lots of dimension to the flower.  The flowers have 3 colors of violet, some pink and on the top sides (sorry didn’t get a picture of that) some yellow in the center.  I shaded them lightest in the middle and darkest along the outside edges – because that is the way I thought they looked good.
Orchid 4
Next I layered my flower, curling up the edges as I went and added some yellow Flower Soft to the middle because I felt it was too flat.
Orchid 6
My last step before putting my airbrush system away was to color some cream ric-rac to match the flower.  The dimension on this card is perfect and reminds almost more of a Lilly Pad flower then an Orchid but I still like it anyway.
Orchid 8
Remember just because you don’t have a cartridge that someone used on a project doesn’t mean you can’t make something.  I love to improvise and add my own twist to things.  So break out your cartridges and imagine what you can make with them!
Thanks for visiting today and come back Tuesday for another great LIAB Project. 
Wini aka LooneyBug aka PoohBearBaby from the Cricut  & Circle MB’s

August 17, 2010

Lifes a Beach Bon Voyage card

Hi, I'm Flo and I am a guest designer this month for Tuesday Treats. I am Flohill on the cricut message board and my blog is http://flos-a-scrapin.blogspot.com/ This months cartridge for Tuesday Treats is Life is a Beach and I designed a card from this cartridge.
LIAB
The first Pic shows the gypsy and the icons from LIAB that I put on the screen.
LIAB
The 2nd pic shows where I placed the papers to cut the icons. I have always used CDS or a gypsy. I have used the whale, the dolphin, the gekko, the starfish and the chairs at 2 inches. The waves at the bottom are at 1 inch and the 2nd layer is slightly smaller to fit the mat. The wording is 1 inch. I used textured cardstock from http://www.grant.com.au/ and A5 designer Paper 'Azalea' from Rosie's Studio. Both of these I cut on medium speed pressure 4 cutting blade 5 and double cut. The tops of the starfish did not cut well so I discarded those. Once cut I put together the layers of the dolphins, the chairs and the whales but the gekkos I left without the layer as I had cut them in coloured paper.
LIAB
I used a premade card from a pack and used SU ink pads to sponge the background inside the card. I used 3 shades of blue- Brocade Blue, Brilliant Blue and almost amethyst and for the sand used creamy caramel, barely banana, and summer sun. To get the sun I sponged around a circle and left the centre white. You can see in this 3rd pic. I have added the whale and also added the first bank of waves.
LIAB
I have added 3 sets of waves and have made these stand up by making them pop up like a pop up card with the attachment to either the waves behind or to the back of the card. I have added the whales to the back of the card and the dolphins to the waves so when you open up the card the waves and the dolphins pop out from the back of the card. You will see I got a bit messy and ended up with blue ink on my sand so I used the starfish to cover this and then added the gekkos. The life's a beach wording came from the cart and has been cut at 1 inch and outlined in gold pen.
LIAB
LIAB
The wording on the bottom of the card reads Bon Voyage again from the LIAb cartridge.
LIAB
LIAB
LIAB
This is the front of the card and again the wording is from the font on LIAB and the whale and the beach chairs.
Below I describe how I have made the waves pop up.
I made the waves from the card pop up so I could put the dolphins in the waves. I used the system I describe here but made the boxes very small so they would be hidden behind the waves.
How to do the popup parts. I have made this box large so if you are unsure how it works you can see it but when you are using these to do popup cards make the box so the object you are popping up hides the box.
strip of paper to make box
Take a strip of paper and make a square. box
Adhere one side of the square to the base of the card directly in front of the fold of the card. box adhered to base of card
Adhere the back of the square to the top of the card so now when you open the card there is a square box in the fold of the card. box adhered to back of card
Adhere the object that you want to popup to the front of the square. Look at the pictures and you will see the card now can close and the object lies flat and pops up when the card is opened. place object on front of box stand back of card up object stands up object bends forward and down when card folds
The waves I made were quite small and the boxes behind are about 1/4 inch but they have worked well and the waves and dolphins pop up. I hope you have enjoyed looking at how I di this card as much as I enjoyed making it. Check out my blog to see other things I have done.

August 10, 2010

Your Heart will Flip Flop over Life is a Beach!

Hi everyone!  This is Bobbi Jo from SweetSassyDiva.  I am the guest designer today for Tuesday Treats.  This month we are using the Life is a Beach cartridge.  The hardest thing is trying to decide what to make and the inspiration does not always come so easily.  I sat down with my Gypsy and looked over the different images while thinking of what I might want to make for all of you.  Then, I thought what would be better for Tuesday Treats than some treats! 

I looked at the different images on the Life is a Beach cartridge and thought I know.....I will make some cookies!  YUM!  Some of you might not know but, Mercy has been trying to enable me about the Cricut Cake since it was scheduled to come out the beginning of this year.  Ok I must say she is not the only one trying to make me succumb to the Red beauty.  I have held strong and have waited.  The only thing that kept taunting me was cookies!  I have two little ones that would love shape cookies and who wants to store all of those cookie cutter shapes?  Although I guess you could use them to decorate your Christmas Tree or adorn your kitchen wall but, I just don't need all those cookie cutters in my house.  Plus, that is less room for more Cricut cartridges! So, we will make some cookies that you will FLIP over! 

You can use your favorite rolled sugar cookie dough or you can use the Sugar Cookies recipe.  Just make sure the recipe is for cut out cookies not just a sugar dough recipe.  You want a recipe that will not rise much nor spread so, that it maintains the shape.   Ok.....mix your dough.

Now, that you have made your sugar dough recipe you can follow along and pause the video as needed below.  (If you signed up for email subscription, you can view the video by going to my website.)  Enjoy the show.....


I hope you enjoyed the video and the tip on using the hide contour button with the upper left hand silver button.  This is extremely useful especially for those little lines that are hard to get with your stylus alone.  The recommended setting on the Cricut Cake to cut the dough is pressure 3 speed 3.


Bake the sugar cookies according to your recipe instructions.  Be careful transferring the cookies to wax paper to cool.  They are hot and like to break or dent if you move them too quickly.  Also, do not leave them too long or they might just stick to your pan.  I like to bake my cookies on a pizza stone or you can also use a cookie sheet of your choice.  If you are using a traditional cookie sheet, parchment paper helps that they don't stick to your pan.  Nothing worse than making beautiful shape cookies only to have them not come off the cookie sheet! 

As you wait for the cookies to cool, you will use your Gypsy or your Cricut Cake unaided and cut out the fondant or as I did use the Cricut Frosting Sheets.  The nice thing about fondant is that like cookie dough you can ball it up, roll it out and cut more from it.  Unfortunately, the Cricut Frosting Sheets have a learning curve and can be temperamental.  Furthermore, as you can see there is quite a bit of waste as you cannot ball it back up and use it again. 


In my house, that is not a problem though because I have a little one and a husband with a sweet tooth.  To my son that is a definite SCORE!!!!!  You can also cut them into bits and serve them as edible confetti on ice cream or other desserts.

Follow the instructions on the back of the Cricut Frosting Sheets package for directions on how to use the frosting sheets.  You will take a Cricut cutting mat and like I showed you in the video, grease the mat with Crisco or other solid shortening with a brush.  This is your glue to hold the medium to the cricut mat to cut in the cricut cake.


Place the medium on your mat, load it into the cricut and cut immediately.  The frosting sheets dry out very quickly and humidity will affect them. 


As you can see above, the frosting sheets are not 12x12.  You will need to plan accordingly in your Gypsy or move your arrow keys to begin cutting a bit in from where the medium is on the mat.

On page 64, of the handbook for Life is a Beach, cut out the image using the white frosting sheet at 3.75".  This will be the lining of your Sandal (flip flop).  I cut this one out using the Gypsy image that we used for the cookie base hiding the lines of the strap.  You could cut it out with the lines for the strap to use as guides but, I did not want to risk the frosting sheets tearing.  As you do not see the lines after you layer it and this is not a complicated image, I just omitted the lines. 


Next, we will cut out the strap for the sandals.  Press the "Layers" key and the  key.  This will be cut the same size as the base at 3.75", while making sure that the 'real size dial' is off.  Note: the default setting is off.  I cut this using the frosting sheets in green. 
 
After the cookies have cooled on the wax paper or parchment paper, you can assemble the cookies.  You can use water to gently brush on the underside of the cookie, royal icing or frosting for your edible glue.  I used some frosting to adhere my edible paper to the cookies.


Next, I added the green strap to the base.  You could also add some Wilton Pearl Dust or Sanding Sugar for some added sparkle, shimmer and bling! 


After you assemble all the cookies, you can put them on a plate or in your favorite glass bowl.  I used a pedestal glass bowl lining it with brown sugar to give it a beachy sand look. 


As you can see, I made a submarine, flip flops in various sizes and a cute little bikini top and bottom.  On the bikini, I used a red hot to adorn the top.  These are great for a picnic on the beach, beach theme wedding or any party.  I do not think that these cookies will last long because my family is ready to eat them all up.  These would make the cutest birthday favors just wrap them up in those little cellophane bags with a bit of ribbon.  Be sure to cut out the cute little matching tag that is available on this cartridge as well.  I just know that my son would have lots of kids wanting to trade with him at lunch with these adorable cookies!


What a handsome young man he is becoming! Still LOVE those matching dimples!

I hope you enjoyed the Life is a Beach cookies!  I would be honored if you would follow Tuesday Treats as well as my blog SweetSassyDiva which you can see by clicking here!

I enjoyed showing you how to make some cookies.  I believe my son will enjoy them even more! LOL  I think I will go make some picnic items and head to the beach!  Perhaps, a cool tuna salad made with shell noodles to keep the beach theme going! Enjoy!

Thanks for visiting!

Bobbi Jo
http://sweetsassydiva-gspot.blogspot.com/