Knowing is not enough; we must apply! - Johann Wolfgang Von Goethe

Welcome & Copyright & Disclaimer

Welcome to Tuesday Treats. Hope you have a pleasant journey browsing and getting inspired by the projects you find here. We appreciate and treasure your comments so please leave us some blog love and comments. But before you start your journey here just a small note . Do please read and then you can continue on. Copyright: This blog has a many designers showcasing their projects. Please look up their individual site to check their copyrights for any infringements. My files & projects are also all copyrighted. They can be used as inspiration and for personal gifts only but cannot be used in classes, in magazines or for contests. Please look in the side bar for more details on the copyright. Disclaimer: The designer's designs belong to them and them only & not to TuesdayTreat and The TuesdayTreats will not be responsible or liable in any way for any results or consequences from those designs.

April 29, 2010

Guest Designer: Joy - Elegant Matchbox from TBBM


This is Joy from Obsessed with Scrapbooking and Everyday Cricut and today's gift packaging idea is the matchbox cut from the Tags, Bags, Boxes and More Cartridge. This matchbox is the perfect size for a gift card! It just dresses up and makes that gift card a little more special.


Now, this matchbox was made by cutting the matchbox 1 on page 123 of the handbook at 6". This cut makes the outer wrapper. Next, you cut matchbox 2 on page 124 at 6". This cut makes the inner box. There are also options to have a clear window on the outer wrapper which you could cover with acetate that has been stamped with Staz-on - that would be a cool look. I used Core'dinations paper since it is so wonderful and strong!


The top pieces and paper are all from Anna Griffin's Isabelle Line.

To attach a ribbon pull, I punched a hole through my felt ribbon and the box itself and then threaded a large red brad through it. Brad was by Basic Grey. Ribbon is from Papertrey Ink.


A word about the outer wrapper - it's a snug fit. You can rest assured that this matchbox isn't going to suddenly open up and dump out its contents. Altering the size you cut things at significantly changes the way the box works so I don't recommend that. Using my Gypsy, I laid out both parts of the box so I could cut everything once on a 12x24 mat. That helped save time!

Overall, the box was quite easy to make once I figured out that I needed to cut matchbox one for the outer wrapper and matchbox two for the box itself. I use some Georgia Pacific cardstock I got at Walmart to do test cuts and that really helps to cut down on wasting "good" paper. I highly recommend you get some - it's 150 sheets for less than $6 and is in the office supply aisle.

April 27, 2010

Money Holder Card

Hi, it’s Wini from LooneyBugDesigns – also known as poohbearbaby on the Cricut Message Board.


I am so honored to be your guest designer today. Honestly it was kind of intimidating when I saw who the other designers were this month (talk about MAJOR TALENT) – but I figured we all have our own styles and I might just be able inspire someone out there. My style is fairly simple and my project today is no exception.


I wanted to make a card that was simple and easy to reproduce and since graduation is fast approaching I decided to make a money holder card. I love that this basic design can be used for any occasion (just change your color scheme) and can be decorated simply – as I have done today – or more elaborate to fit your own personal style.


I also decided to step out of my comfort zone and make a video of my card. This is my first “official” video and I have decided I hate my voice but it is what it is and I can’t change it – LOL! I know it isn’t the best video out there but it is a big step for me. I hope you enjoy it!


My project today features Tags, Bags, Boxes and More Cricut Cartridge and Plantin Schoolbook Cricut Cartridge.

My video is in 3 parts - guess I need to learn how to speed these up - but it isn't so bad for my first attemt.  If anyone wants offer any advice or tips - I would be more then happy hear them!


Here is the finished card and a close up of the flower and the "Bling" from the Spica Marker - LOVE THIS!


April 22, 2010

Sporty Fowl Layouts

Hi, everyone!
 Birds of a feather flock together so we are all here to enjoy our crafting passion as /*one*/. 
This is imafarmgirl with some beginner style gypsy/cricut fun for you. Thank you for having me as your designer today. I am very humbled. I feel I am a beginner in the world of designing as I never used design studio as many of our fellow crafters were well versed in. After I tried the Gypsy at a Gypsy demonstration ,I knew she had to go home with me and the new learning curve started! I would not have been able to learn the ins and outs of the gypsy without the supportive help from all of you on the cricut message board through posts, photos, and video. What a helpful "flock!"  When people post their creations with cuts, I would practice them myself. I've built some awareness with the ability to navigate the gypsy and am feeling more and more comfortable with the gypsy and creating.  I hope all "new and experienced birds" can all have fun with these layouts and their gypsy. Thank you for having me. Imafarmgirl
  1. Layout: A little bird told me…
    Supplies Used:
    Cricut Cartridge: Straight from the Nest
    Paper: Stampin’s Up! Sending Love Specialty Designer Series, Real Red, Very Vanilla, Chocolate Chip
    Embellishments: Pearls Kaiser Basics, red faux rhinestone from Recollections
    Details of the cuts: bird corner from the Corner function key 4”. (Pg. 29) Select the Advanced tab and flip the image. Cut bird corner at 4”. Cut the bird corner shadow at 4”
    Phrase & phrase shadow-pg. 29 “A little birdie told me”: 3.65”
    Flower: 3.75”
    Border- pg. 29- select 2 sets, flip one set, weld: 1.26”
    Tree-pg 38 cut 3 times at: 8”, 5.50”, 4.50” When I cut the top of the tree I actually had to do it manually with the cartridge in my Expression. My gypsy would cut the swirls too fast never cutting slow. The result was it would either rip the swirls or not make the complete cut on the swirls. So I cut the tops of the trees lowering my speed to low using the cartridge.
    Photo mats : cut 3 at 6-1/4” X 4-1/4” 


  1. Layout: Whoos Graduating
    Supplies Used: 
    Cricut Cartridge: A Child’s Year, Straight from the Nest
    Paper: Stampin’s Up! Bashful Blue, Real Red cardstock, Bazzill brown, DCWV The Grade School Stack, B&W Alphabet Rusty Pickle, basic black & white from Joann’s.
    Embellishments: buttons, brads from Making Memories, white signo pen for faux stiching,
    Details of the cuts: 
    Owl, owl layer/shadow, layer pieces-SFTN-pg 30- 3.0” 
    Diploma-ACY-2.13” Flip and weld the diploma to bottom of the owl.
    Font-ACY Whoos graduating 1.5” weld, Look 1.21” weld
    Graduation mortarboard-ACY: 3.0”  black, 3.32” white. I wanted to off set it and there is no shadow function for this. I offset it using pop dots under the black piece.
    Photo mats: cut 4 at 6-1/4”  X 4-1/4”. 
    Photo corner: hand cut off a scrap.


  1. Layout:   Swish
    Supplies Used: 
    Cricut Cartridge: Sports Mania, Basketball (Solutions) Don Juan
    Paper: Martha Stewart craftstock grey,
    Embellishments: fortune cookie strips, Making Memories page pebbles & black staple, buttons, black glaze pen for faux stiching
    Details of the cuts:  Basketball boy and blackout-SM-3.75” Flip the image
    Border-SM- pg.52- select 2 images, put on mat weld arms, copy to make 2 cuts for each side of the layout.
    No Harm NO Foul phrase and blackout- Basketball-3.5” basketball and blackout-1.75”
    Swish-Font: Don Juan-2.0”  Weld
    Photo mats:  cut 3 at 6-1/4”  X 4-1/4” mat: cut 3 at 6-1/2”X4-1/2”


  1. Layout : Swoosh
    Supplies Used:  Stampin’ Up! corner rounder, hole punch
    Cricut Cartridge: Sports Mania
    Paper: Bazzill red, brown, black, basic black Joann’s, orange basketball paper Joann’s
    Embellishments: Making Memories washers & black brads, Bazzill red brad, Moments Remembered journal tablet Little Yellow Bicycle, Joann’s ribbon, Cougar sign
    Details of the cuts:  SM-pg 54-swoosh-image, shadow and layer -3.5”
    Photo mats: cut 3 at 6-1/4”  X 4-1/4”


April 20, 2010

An Earth Day Project


Hi everyone! Let me introduce myself really quickly. My name is Elizabeth and I am a recent college graduate. I was introduced to the Cricut world about a year and a half ago and I have never looked back! I have a big Expression and a Gypsy as of Christmas of last year. My style is pretty simple, but I love it! I love to make cards and gifts, but my favorite thing is still scrapbooking. I hope you enjoy this project!

So, let me start off by saying I am a little nervous to be here, but am also excited to share my project with everyone. I have a small blog that I mainly started for keeping an archive of past projects for personal use, so this is my first time sharing with a large audience.

I had the tree box on page 127. I am sad to admit that although I have owned this cartridge for over 3 months, I had not used it yet!!! I hadn't even linked it to my Gypsy! Ok, please tell me at least a couple of you have some cartridge sitting somewhere on a dusty shelf that hasn't been touched in forever... it might help me get over my guilt...

I will admit that I am very glad this was not a video! Because it did not work out at all how I planned it. At first, I thought this was a box like one you would open. After I assembled a test cut I realized that it is more like a 3-d object, but you will see how I worked around that so I could still put some goodies inside.

Here is the tree box after all the scoring. I used my Scor-Pal to make the scoring a little easier. It worked really nicely to line up each score mark. I was surprised by how many flaps this box has, but this was the first box I have made.


This is the box after I inked up the edges. I was going for a distressed, recycled look to fit the Earth Day theme. Keep an eye out for more recycling later on in the post.


Then I had a brilliant recycling idea! I asked my fiance if he had any old papers from college that he didn't need anymore. He gave me a funny look, but handed me some papers.... he is used to not asking why I need strange things in the craft room anymore. :)


Then I got out my crimper that I bought at Michael's with a 50% coupon (the only way to shop really) :) and started crimping all the strips. After I crimped them, I squished them and shaped them until they had the look I was going for. Then I filled the box using the window as my opening until it looked nicely full, while still having room for other goodies.


Okay, let me address the green triangle I added as a layer. This was a big issue as I was working on the project. I was originally going to use this paper for the entire box, but then I didn't think it felt stable enough. So then I had the brilliant idea to use the Gypsy to create a layer! After all that's what the Gypsy is supposed to do! Unfortunately, I only own one cartridge with a triangle. No problem, right? Big problem. The cartridge is George and I am one of those unlucky people who still have not been able to link George to my Gypsy. Ugh. So I did something kind of crazy. I hand cut all the triangles. Woah. I was worried that I had forgotten how scissors worked that way after using the Cricut and my Gypsy exclusively. Don't worry I guess it's like riding a bike. :) I just traced the box and then cut slightly smaller so it would layer. In order to cut out the window, I traced the piece that had cut from the window originally and traced that. Then I cut that out and prayed that it would work as I had used up all of the one sheet of patterned paper I had bought. Note to self: Always buy at least two sheets. Anything less is tempting fate. The next picture shows the back of the box. This triangle was much easier. :)


I wanted to include a small packet of seeds as an Earth Day gift in the box. Then I came to another roadblock. The seed packet was way too big! No problem, I told myself as I took calming breaths. ;) I just folded it in half and glued it together with my ATG. That ATG is seriously a life saver! Here is a picture of the box with the packet of seeds inside.


Then I stamped a piece of cream cardstock with this awesome clear stamp I found at Hobby Lobby. Recently our local Hobby Lobby expanded by 8000 square feet!! It is like Christmas every time I stop in. I am constantly finding products they didn't stock before. The best part is they mix them in with the old merchandise so it feels like a treasure hunt! Oh, the simple pleasures in life. :) Anyways... I found a spring themed clear stamp set that had this adorable sentiment. I cut around the edge and distressed it with my Tim Holtz Paper Distresser. I couldn't decide where to adhere it down. Then I had an idea! I would tuck it inside the window and make it a little card or gift tag.


Here is a picture of the back of the card. I just wrote a small note on there and signed it. Here is another place where things did not go as planned. The pen I grabbed was slow to start and the 'H' on "Happy" just did not look right. I decided to widen it out and stylize the letters a little. Again, I am so thankful this was all not on video! I don't know how everyone does it!


Thank you so much for taking the time to read this long post! I hope you enjoy my project! I actually had a lot of fun making it once I got over the nerves. :) If you would like, feel free to check out my blog ScrapSweet Designs Again, thank you so much for looking and have a great day!


April 15, 2010

Trudge through the deserts

to see one of the seven wonders - "The great Pyramids" or if you have kids like me you might have to save it for a later date and just make do with a gift box like this


This is a fun box to make and so versatile. I chose to make mine as a gift box for "the people from mars" - oops !  for Men. Well... if you believe that Men are from mars then.... :)..
This one holds a perfume inside for my special martian.
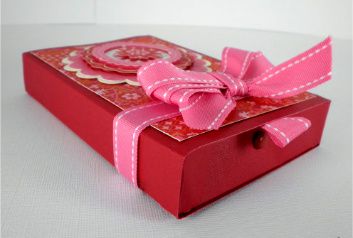
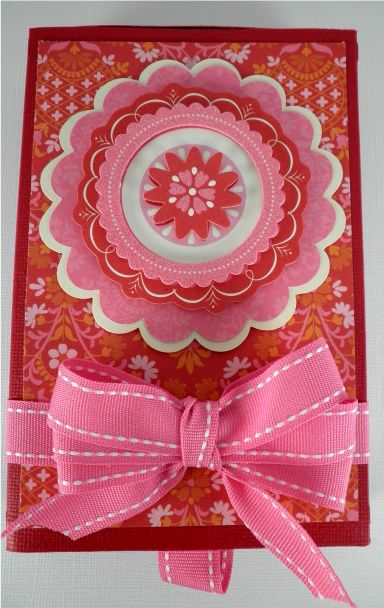
This box is from Tags, bags, Boxes and more Page 125 and button 44 on your keypad layout numbering starting from 1 proceeding left to right


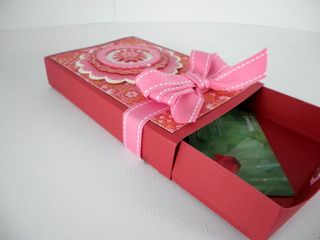
Here are a couple more views


The box opens by lifting at the top


I have added support so that the perfume bottle does not fall or rattle inside.


So close it up and tie a pretty ribbon - maybe more of that  gold one and the box is ready to give to that special guy in your life. Yep hubby gets this for our wedding anniversary which is this month.
I have used a 12 x 24 mat and a poster board for cutting the base. Metallic shimmer from DCWV is the one used for gold. And the other paper - for the top half... Hold on ... Sandpaper. Oh yes!!!.
I of course did not want to put the sandpaper in my cricut for cutting so I just figured the basic triangle in the Gypsy file, cut the template using cricut and then used that template to figure out how big I wanted the Gold and the sandpaper - made sure they will overlap some and cut 3 sets pieces (each) for the 3 sides. For the 4th side at the bottom I have used the same brown cardstock as I have used for the decoration (which are images from Destination and My  World). And then glittered an stickled away.
So off to the gypsy to see how to figure out the triangle and also to take a brief look at some aspects. No file sharing this time as it is pretty basic and easy to do


Just add any triangle from any cartridge like George or Plantin or GW. Unlink the golden chain ie the aspect chain as we have to manipulate the width separate from the height. and try to match up the scores as in this image


After this increase the size, as you do not want the triangles to fall short. You can always trim the excess away. Cut and check and fine tune the size. When we use the round  pink circles to increase (or decrease)  note that even with the link off it will increase proportionately . So you can leave the link on or off while doing this -  it does not matter . After you do this you can copy/paste the triangle to a new page and delete it from this spot.

Note - This is just to show you how to do it and the actual dimension in my box varies as I used a 12 x 12 for this example and my box was cut on 12 x 24 after making sure the height of the triangle will accommodate a perfume box with room to spare.


This is a peek into the file. I added images after searching through the cartridges for Egypt. The height is based on the width f the golden paper ie the lower part of the triangle. I tried not to split the triangle into exact halves for aesthetic reasons but also had to have it at a certain height for the images to cut without tearing


For the perfume holder I just traced the perfume bottle's base onto a paper to figure out the dimensions. Mine was oval in shape and I measured out with a ruler and then added an oval shape onto the Gypsy - mat adjusting the height and width accordingly. Well that was the starting point . To figure out the rest I  took it to the drawing board and  This is what I came up with . The inside oval (which the perfume bottle fits snugly into) is surrounded by a octogon shape so that scoring the sides is easy (on score pal etc) and it can be  folded down. If you choose a circle then you have to hunt for a plate or a cup or a compass or divider to score the circle. Nooo. So I chose an octagon. You can also choose a hexagon - any shape which is similar to a circle which just has sides - ha ha
Then I welded squares to the sides to form the sides . I also added tabs & welded to squares so that it can be attached to the inside base of the triangle when glue is applied. I did not add score marks as  the scoring area is quite easy to figure out. Score marks are a pain and I try to do without whenever I can get away with it.


Now as for the assembly of the box itself,  here are some pictures. Note I chose to have the box open at the bottom so I assigned the bottom as the side which has 2 tabs and I did not glue it..  Also after scoring the glue needs to be applied on the outer side. You can glue the bottom side after assembling but I am not gluing it on and instead will use  the golden ribbon  to tie a bow after firmly attaching it to the base. You can figure out different methods for closure - maybe brads and elastic cord around..


So after doing this and cutting out triangle templates - I made 1 template.   I cut the images with brown cardstock first so that I can make sure f the height for the golden paper and then cut one triangle template splitting it. Using this I cut 3 pieces of sandpaper slightly with more height so that they can overlap and then 3 of the golden pieces also a tad taller.  I cut one full triangle with cricut for the base using brown cardstock. So that the seams are not unsightly I glued a golden colored ribbon using fabric glue. then scored the perfume holder and stuck it inside the bottom after opening I stickled the images and  glued it on after it dried.
But this box is so versatile that it can be used for almost any season
Once you get the base triangle just assemble the box and then add fun things to the triangle. I have just used some scalloped circles and plain circles and some petal like shapes played with it used markers etc and made 3 version of the box. I just made 3 triangles to show you what you can do and added the triangles to one of the sides of the box. This was done very quickly to give you a rough sketch but you can of course spend more time on it and work on it more . One thing I found out is if you take a beige colored paper and then use wet markers like sharpie, copic or momento ink the wetness in the marker will distress the paper and some paper bits peels off giving the paper a very nice flocked texture.!!! The red Santa triangle looks so much like flock up close without having me go to the trouble of flocking it.
Here is the bunny box and yes it is stuck to the triangle ( ;) I placed repositionable adhesive - zig two way to temporarily place it on the triangle box so that I can switch mine for the photo)


Santa


and lastly the Witch. You can also make the triangle into just a hat without the witch's face or maybe add a broom etc


Hope you enjoyed this project. I so enjoy reading what you all think of it and treasure each and every one of your comments.  Thanks for reading this post. Do please drop in to my blog The Bug Bytes to see more projects and Gypsy tips
Hugs
Pam aka thebugbytes