Welcome to Tuesday Treats. Hope you have a pleasant journey browsing and getting inspired by the projects you find here. We appreciate and treasure your comments so please leave us some blog love and comments. But before you start your journey here just a small note . Do please read and then you can continue on. Copyright: This blog has a many designers showcasing their projects. Please look up their individual site to check their copyrights for any infringements. My files & projects are also all copyrighted. They can be used as inspiration and for personal gifts only but cannot be used in classes, in magazines or for contests. Please look in the side bar for more details on the copyright. Disclaimer: The designer's designs belong to them and them only & not to TuesdayTreat and The TuesdayTreats will not be responsible or liable in any way for any results or consequences from those designs.
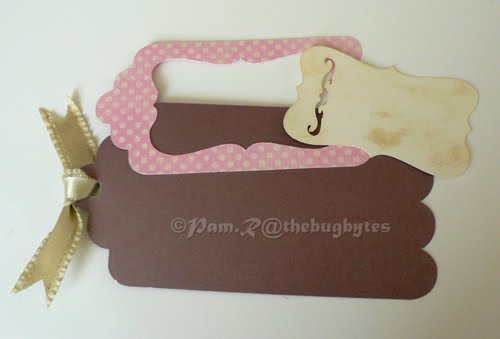
Hello Everyone! I am Susie McCormick, known as Susiemccormick on the Cricut Message board! The hardest part about this project was coming up with what to create using the Sentimental cartridge. I decided to make computer password journal but you can change the word file and make an address book or even a calendar. This is the only cartridge you will need for this project.
The Front
The Back Supplies: 2 – 12 x 12 same patterned paper (I used DCWV Old World) 1- 12 x 12 coordinating paper 2-6 x 6 chipboard pieces 1- 2x 6 chipboard piece One sheet of8.5 x 11 black cardstock Red tape (or similar) Binding method (Bind it All, Cinch, rings) Grunge paper or chipboard, string or chain, rings, bead, embossing powder (for key) White cardstock, shimmer spray, pearl (for flower) Ribbon Big Bite-Crop a Dile 5 mini brads Stapler (I used Tim Holtz mini stapler) Gypsy File for Phone, Mat, Key, Tabs, Letters and Flower
Cut and attach, with red tape, the two sheets of same patterned 12 x 12 of paper to make a 12 x 24 sheet of paper. Trim this down to a 7 x 15 sheet with the seam in the center. This will be the paper for the outer cover. Save your scraps for the letters later. Lay your chipboard down against the wrong side of the paper leaving 1/8 inch gaps between the chipboard pieces. Make sure that you have a ½ inch border of paper around the chipboard to fold over. I attached some adhesive to the chipboard so that it did not move around while I am covering it.
Attach red tape, to all of the outer edges of the chipboard and miter the corners of your paper. Fold your paper over and burnish with your bone folder.
Cut your coordinating piece of paper into 2 -5 ¾ by 12 inch sheets..Attach these together with red tape and trim to a 5 ¾ by 13 ¾ sheet with the seem in the middle. Save your scraps for the alphabet tabs. Attach this to the uncovered chipboard using a strong adhesive. I used my ATG gun for this. Make sure that you score, with your bone folder, between the gaps in the chipboard so that you have nice creases.
Cut a 4 1/2 by 4 11/16 sheet of black paper. Cut out the mat and phone with the gypsy file and layer on the black cardstock. Attach a mini brad to the center of the phone dial. Attach this to the covered chipboard base. I attached a brad to each corner of the mat using my Big Bite Crop-a-Dile.
Next you will have to attach your binding. You will need punch your binding holes at both ends of the covered chipboard cover along the 6 inch sides. Make sure that you center the holes the same on both sides so that they will line up when folded later.
Print off 10 pages of your password sheets. Here is my word document. Trim these to 5 in x 5 in sheets and punch binding holes along the top. Make sure that you have these centered with the holes in the chipboard cover. Fold your chipboard cover so that the lining is on the inside and the holes on both sides meet at the top. Add the password sheets to the side without the phone and bind. Cut your key out of chipboard or grunge paper and heat emboss. I used silver embossing powder and distressed with black ink. I attached the key and a bead to a phone lanyard and attached it to my binding. I then tied matching ribbon to my binding to decorate.
Cut out the five tabs from the extra lining paper. Fold each one in half and add the letters from the gypsy file. Attach the first tab to the first sheet and then every 4th sheet, staggering them. I used Tim Holtz's mini stapler to attach them.
Next, I made a vintage 3 -D flower using a file I created from this cartridge. You could use a premade flower from another cartridge but I really challenged myself to only use the Sentimental cartridge. I got the idea for making the flower from this blog. She has a video tutorial but I just got a Flip camera and have been wanting to do a video tutorial. After you make your flower adhere it to your cover.
I hope you enjoyed my tutorial. I had a fun time putting it together once I decided what I was going to do!
Hello everyone! I'm Cathy, aka Kissakoala on the Cricut Messageboard. Today, I'm the featured designer. I'm honored and a little nervous, so I'll just jump right in!
Today's project is very simple. I've had this idea for some time, in fact, I have to give credit to my sister in law for the idea. She told me how she had purchased magnet frames and thought I should make them. I've been thinking about this for some time and thought it would be a great project to show here.
Supplies needed: Magnet sheeting. I purchased this at Michaels. It comes in a roll and measures 12" x 24". I just needed to unroll it and place it on a flat surface so when I cut it out, it would lay flat on the cutting mat. You also need a sheet of cardstock. I chose this print from DCWV Glitter Stack. I also have glitter paper. I used this to cut the flowers, but you can use what ever paper you prefer for the flowers. And, to finish up, a little bling.
Since this month's featured cartridge is Sentimentals, and I don't have this particular cartridge, I went to my trusty Gypsy and viewed the images on this particular cartridge. I found a shape that is also featured on Base Camp - the stamp edge shape. This is perfect!
Here is a shot of my Gypsy screen of the final project. I used the stamp edge shape for the frame, but to make it a frame, I used a square from George - shaped it into a rectangle - slightly smaller than 4 x 6 so it overlaps your photo. Then I used flowers from George (shift version). Simple, right?
The great thing about this magnet sheet is its self adhesive! Its not necessary to get this kind of magnet sheet, but it sure helps! I adhered the cardstock to the magnet sheet before cutting. To minimize the amount of waste, I cut the magnet sheet slightly larger than my project and used an 8 x 8 sheet of cardstock. A strip of 2 x 8 was left over (and this can be used for cards at a later time).
I used multi cut set at 2, blade at 6, pressure at max, and it sliced through both layers easily!
Here is the final project! Since its glitter paper, I used Zip dry to attach the flowers to the frame and also to attach the bling to the centers of the flowers.
By the way, those little ones in the photo are my twin grandchildren..love this pic!
This frame can be used landscape style....
...or can be used portrait style. (another one of my grandchildren) I have to admit, I"m quite addicted to making these frames! It will be a great item to sell at the upcoming craft fairs my daughter and I plan to do this fall!
Thank you Tuesday Treats for the chance to show off some of my work. Hope you enjoyed today's feature!
So my craft table is trashed, and this project is why. :)
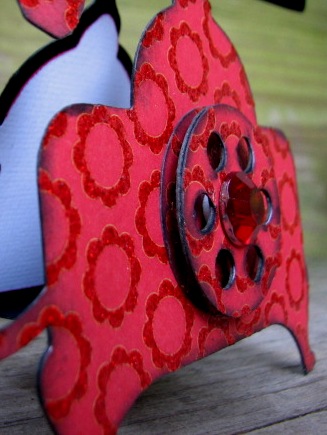
This month the focus is on the Sentimentals cartridge. I thought at first I'd do a scrapbook page, as that is my main choice of projects, but I kept looking at this beehive and bee and couldn't come up with a page idea, but I did come up with a gift box idea.
The box is my 6 sided iris-lidded box that I designed last winter on my Gypsy, and offered up in this post on my blog. The downloadable gypsy file for the box is on that post as well as instructions for assembly of the box; so I won't go into detail about making the box base. I love this box even though it isn't perfect, and I'm glad I'd created it because a hexagon box was perfect for a bee themed project. :)
So first I cut my box out in brown cardstock. (all cardstock and printed cardstock for this project is DCWV)
I apologize for the quality of the pictures of my gypsy screen. This is a view of the filigree cut that is layered over the box. It's actually the beehive filigree layer welded together a few times with another little scroll-y thing to fill in the spaces. Here's what it looks like cut out.
I ran the filigree through my 5" xyron and adhered it to the box. You can see the beehive shape a lot better below. On the gypsy, the filigree runs off the page. I did that ntentionally; partly because I had trouble seeing the box edge through the filigree layer to see how close to the edge I was. And partly because I was lazy and figured it would be easy to just snip off the excess filigree, which I did. You'll notice I did not allow the filigree to run over the tab that is used to adhere the box together.
Once the filigree was attached, I assembled the box as directed on my blog's box post. As I mentioned in that post, you have the option of the top closing with the iris concaved or with it sticking up. For my beehive box, I chose the top sticking up.
I created a small shaped card from the beehive on my gypsy. It is attached with tiny rectangles, and one beehive is flipped so that the front and back will match when they are folded together. Here's the gypsy screen of the little card.
After cutting out the card, I decided to try something I hadn't done before. Some time ago I had bought one of those mini marker holders and a marker set but I hadn't used them yet. I took the card off and flipped it white side up on the mat. Then on my gypsy I wrote out a sentiment message for the inside of the card, and had my cricut write the message with the mini marker. It worked okay. My positioning of the card wasn't quite exact but it was still okay. I do think I'd rather have the gel pen holder and the gel pens though. Here's the sentiment on my G:
You can see the inside of the card below.
After assembling the card and bee layers, I stickled them all (filigree only) with Cinnamon Stickles. Once they were dry, I wound some craft wire into springs and attached them to the backs of the bees and the back of the card.
I tied the card onto the box with ribbon, and I'm done!
This box is perfect for a candle or other small gift. I plan to buy a beeswax candle to go in the box. :)
I am so very happy to be at Tuesday Treats. I was invited by Pam to fill in for somebody who couldn't make it today. A bit intimidated to be among so many great talented ladies and hoping you like my card.
The cart of the month is Sentimentals and I chose the phone from page 59. I used my Gypsy to weld both sides of the image and to weld the doorknob from page 34 to use it as a closure and as a stand for the card. It did not come out as I had it in my mind so I had to tweak it a bit and change plans.
Here is my
Hi card
at 4.5 inches high
I used the DCWV Songbird Collection stack for this project.
*******
The Hi was cut at 1 inch and you can find this on page 25 of the handbook.
*******
A closer view of the dimensional dial.
*******
I am showing here a strip of black paper and that is the doorknob cut that I ended up
welding to the card base.
*******
Here you can see the front of the doorknob.
*******
The back of the card and the other side of the doorknob.
*******
I am showing here a little pouch I made with a scrap of cardstock to insert the one side of the doorknob.
*******
This is the inside.
When I started the card I started it with a white cardstock as the base but then I decided to use black instead and the white insert you see here was from that first try :)
*******
This is a photo of my Gypsy screen where I added all my images ready to be duplicate to cut on the next layer. This is how I do most of my trials and errors. After I am satisfied, then I re-arrange everything to be cut, if possible, on one 12 by 12 mat.
*******
I know it's only July but this year has gone by so fast. I, along with my sister in law and a few friends are making cards for Operation Write Home. We have challenged ourselves to make 1000 cards to send by August. Unfortunatley it has been going very slow but we will have a dent into our goal to send.
I have started making Christmas cards and Halloween cards to send to the organization and this is one of the designs. It's very easy, and is something you could production line and make a bunch for the holiday season.
Hope you enjoy it!
Supply list:
Christmas Noel Cartridge
Gypsy (Optional)
Kraft Cardstock
DCWV Christmas Shimmer Stack
DCWV Holiday Collection - The Christmas Stack
Martha Stewart "JOY" Edge punch
Martha Stewart Score Board or other scoring tool
Embossing Ink Pad
Snowflake stamp (I used one from Inkadinkadoo's Snowflake Set)
Post it notes
Liquid Adhesive like Scotch Quick Dry
ATG or other tape adhesive
Directions:
Cut Kraft cardstock to 8.5" x 5.5" and score at 4.25" to create an A2 size card.
With the card facing you, on the right flap, use the Martha Stewart edge punch to apply the detail to the edge of the card. Center your paper in the punch using the tick marks on the punch. This will ensure you have the wording centered on the edge. Continue to move and punch the full edge of the card.
Cut a 1" strip of paper to use behind the punched edge.
Apply tape to the inside of the card just below where the punched edge is.
Align the 1" strip to the back side of the card edges and close card attaching the strip to the inside front.
Use post it notes to cover the punched edge.
Stamp using embossing ink and the snowflake stamp in a random pattern all over the front of the card. Rotate the stamp and stamp off the edge so it looks more random and natural.
As the embossing ink dries, the images will become darker on the kraft cardstock.
No need to emboss with powder unless you want to.
Cut your Christmas tree on the base image from a medium green shimmer paper at 4.5" and the blackout from the gold shimmer paper also at 4.5". The image is located on the 3rd row, 2nd button in.
Using the liquid adhesive layer your detail cut on the blackout cut of the tree.
I used ATG tape to adhere the tree to my card, but you could also use pop dots for added dimention.
I left the inside of the card blank, you could stamp or write your own sentiment or note before sending.
Well I have been framed at the Cricut MB and people call me "The Enabler" but guess after reading this you might think the term "Crazy" is more applicable and you may even be justified in thinking that
This is Pam from TheBugBytes . Go grab some coffee and maybe a Donut or sandwich too as this post is exceedingly long..
My project for today is (clearing my throat and nervously just getting the dreaded word out in a whisper! ) Layout from sentimental.
So knowing that this maybe just the 5th or 6th layout be kind to me.Well even if the layout sucks and you want to do this just take the time to read this because I have tried a new technique -making your own customized woodenized frame - and even if the layout doesn't appeal at least you might use the technique (Btw if you like all these emoticons and want to use them on your own blog - it is as easy as posting with firefox after downloading and installing greasemonkey.)
Ok without further adieu. Here is my layout. Except for the title which is from graphically speaking, the border in the pattern paper using Martha Stewart lace punch, the ribbons, lace , pearls and the flower embellishments all the cuts are from sentimental
Yes! That Includes the Frame!!! It looks like wood doesn't it? In a way it is . So Mya not copper or gold! but a wooden texture got by using wood filler - the drying sandable kind - on chipboard and then sanding, staining and sealing it. Ok my secret is now out. .
Very easy process. Not time consuming in the sense you do not need to labor over it. But the process to dry in between stages does take time. So plan to give 2-3 days time before you want your layout finished.
Materials I have used
I have listed almost all important material
2 sheets - chipboard - .022 thickness acid free (I get mine form uline or in small amount - ckresales)
cream color cardstock 2 - 3 - sheets
DCWV stack - shimmer and old world
antique linen distress ink - Tim Holtz
sakura white souffle pen for feather texture
ancient glass embossing liquid by Plaid (found at Micheals)
lace and ribbon
some flower buttons
some tiny cream color ribbon roses
Martha stewart lace punch
cutter's, scissors
blister pack - plastic (which I always save after freeing out the cartridges)
gold foil pen
glue - pop darts, glue dots, zipdry and zig
Cartridges - graphically speaking (only for the title) and sentimental
and of course for my technique
a drying sandable wood filler. Be careful if you get a wood putty for most of that is nice to roll out but does not dry . (I have used Elmer's wood filler - walmart)
a wood stain - color of your choice ( I used Red Mahagony miniwax)
a sealant - Be careful about this too. Read the instructions on the stain in the shop itself and get the recommended stain. I have used the polyurethane as it clearly said that for Red mahogony I have to avoid polycrylic and use this one. Also choose a finish. I have chosen satin but you can also choose glossy.
A plastic palette knife and foam brush )
texturisers like toothpick, Q tip with cotton removed etc.
Rags and some water.
Now for putting the layout together. Note you do not need the gypsy or CDS at all as there is no weld in this layout. But neverthless for sizing I like to use one of them as it also allows me to alter some images according to my needs.
Here are the videos
Part 1
Part 2
And here are the images from the gypsy file. Note: I have modified the layers a bit from these images to include the ink bottle 3rd layer (you can find it in shadow layer as the color of the shadow is the same) and I have added a circle (from sentimental) to the lens shadow so that you need not search around for a circle punch
page 1 -" layoutdonotcut" - Do not Cut. As this is just the layout sketch
Page 2 - "framecut2"- cut 2 pieces with chipboard (if you are trying my technique). Retain the inside oval template. It will come handy in cutting your photo. I have cut mine going a quarter inch inside
page 3 - "frameshadow" - the mat which the frame and photo sits on which is the shadow feature of the frame. I have used cream colored card stock and distressed it with antique linen tim holtz ink.
page 4 - "accesories". I cut all using cream colored cardstock and again aged it with distress ink except the feather. Then played around with some images using liquid glass embossing, inking, drawing with pens etc
page 5 - "shadows" - I cut this with the shimmer DCWV cardstock - a deep winish brown color. This color is also used as the base on which you can put the lace edge punched cardstock from Old world .
page 6 - tag layer which I cut with a leftover cardstock which coordinated well with these.
Now that the file is done
I first cut only 2 pieces of frame - page 2 with chipboard - as I mentioned 2 to 3 days before . I used the brown side up (mine is white on one side and brown on anther) so that if there is a peek through somewhere it can be easily camouflaged.
I kept one piece aside for backing as I was sure the process will mess up and stain the back and I did not want to put that dirty back on the pattern paper.
Then I opened the wood filler and as it was too wet and liquidy I allowed it to set for about 10 mins and then applied on the chipbard. Warning ! the whole process is Messy. Protect your surface and for staining and sealing it is also recommended that you have open windows - so take it out in that stage.
I used a plastic palette knife, some water to smoothen and applied a thick layer rather like cake frosting about 1/8th - 1/4 inch thick depending on how smooth you want . Then allow it to set for 5 mins and then add texture. Mark deep groves because if you sand after drying you do not want to loose the lines. When the stain settles insie the groove it looks dark and gives a lovely look. Keep fiddling to your liking. You have 1/2 an hour to play . After it set for 1/2 an hour I punched and got back the holes in the frame where it had filled up. You can do I anytime within that time frame (or maybe even more).
Then I allowed it to dry.
Watch the video part 1 to see the technique
Here is how my frame looks dried and unsanded
I did not sand it much as I did want an aged wood look. So I used a fine grain sander and sanded it just a little. You can also go back and keep adding more after all the filler is just wood crumbs mixed in glue. Just use water to bond. and smoothen and play.
I then stained - 2 coats - each coat allowed to dry after removing excess with rag (outside the house - in the backyard)
and sealed
after it dried I added just a touch of gold foil to unify the design elements on the layout
Glued the 2nd piece at the back after this completely dried.
Well that's the new technique. Isn't it worth the time and effort. Think of the possibilities. You can make lightweight wood out of any cricut cut and so customize it. 1 box of filler, stain and sealant go a long way. :)
Now for the rest of the layout.
I just punched the side edges of the pattern paper from Old world with Martha Stewart punch so that it sat about half an inch lesser than the plain base. Aged a lace and added it to this to form a Cruciform composition dividing the one piece rectangle of the pattern paper to make it visually interesting by dividing it unevenly.
Then I took the cream colored feather cutout which was the only piece undistressed. I took a white souffle sakura pan and drew white feathery lines. This when dry acts as a resist and then I applied the ink and attached it to the shadow cut
As for the inkpot I did cut out an extra piece (no the shadow but a main one) using the purple shimmer (same color as shadow) and cut the top and bottom so that just the word ink remained. The cream color cutout I cut hiding the ink word. I will modify my file before sharing. Then I used gold foil and applied Antigue glass embossing liquid. and after drying - some places became green/blue - a happy accident as I liked the patina look it gave. I just added more gold foil over some places to cover up and left some as it is.
As for the lens. I punched the shadow with a circle punch and added plastic/blister pack material at the back to hold the glass finish and still remain transparent.
I also assembled the tag
pop darted the back of the cream mat on one side so that the 2 tags can slide in and out at and angle
Stuck it down , penned the title to pop up just a bit. added cut with scissors to cricut cut from sentimental as I liked the sentiment on it, pop darted the lens, ink and lens and added to layout. The lens while drying showed a crack as my son accidently dropped something on it while watching. I again liked this happy accident . I overlapped the transparent glass on the title a bit
And then added some flowers, flower buttons and pearls (left over from the purse from forever young last time around).
here are some close up views.
& my whole layout once again. Btw yes that little girl is me and that's my grandfather. That's why I decided to include the journal note ( cut out from another pattern paper) - Beginnings.
Whew! That was rather Lonnnnnnnnnn..........ggggggg wasn't it.
So I hope you enjoyed this project. As makeugirl217 says I love followers & comments. Do visit my blog TheBugBytes to see many projects one a whole lot of awesome designer's and the file for sharing can also be found there
Thanks for reading. See you again the next time...
Some humble request from fellow bloggers. You can download the files for personal use and inspiration only. Please do not use it for commercial purposes, for contests or for teaching classes. The same goes for the posts, photos and videos . Please do not post them in your blog directly but you can link this blog to yours.
As this blog is an amalgamation of projects from multiple designers - this content will also be found at the designer's blog. Please respect the designer's conditions for sharing.
You can contact either the designer directly or email us and we will contact them in case you need any additional clarification as to the copyright as each designer has different rules and requests. If you know their original blog (which can be found by navigating from the navbar ->Our designers) please do visit and check as to the exact conditions stated there regarding their copyright.
Designers - A request from you all too . Since we just showcase your project here and make it a fun learning spot , it falls on you to be responsible in making sure you are not fringing on another person's copyright. Please do take appropriate measures.


 and you may even be justified in thinking that
 ) Layout from sentimental.

 .
.