Knowing is not enough; we must apply! - Johann Wolfgang Von Goethe

Welcome & Copyright & Disclaimer

Welcome to Tuesday Treats. Hope you have a pleasant journey browsing and getting inspired by the projects you find here. We appreciate and treasure your comments so please leave us some blog love and comments. But before you start your journey here just a small note . Do please read and then you can continue on. Copyright: This blog has a many designers showcasing their projects. Please look up their individual site to check their copyrights for any infringements. My files & projects are also all copyrighted. They can be used as inspiration and for personal gifts only but cannot be used in classes, in magazines or for contests. Please look in the side bar for more details on the copyright. Disclaimer: The designer's designs belong to them and them only & not to TuesdayTreat and The TuesdayTreats will not be responsible or liable in any way for any results or consequences from those designs.

May 11, 2010

Details, Details. Details!

Hi Everyone! This is Elizabeth from 217 Creations.  Today is my debut here at Tuesday Treats and I am super excited to share this cool altered frame with an adorable twist! We all know that in papercrafting the details can make all the difference between blah and a knockout!  In today's project, I am going to show you some cool detail tricks along with assembly of this frame. 
I bought several of these frames at Target for $1.98.  My husband asked, "Why are you buying so many and why would you want them if they are all dinged up?"  The answer is simple . . . I love to alter items and I always want more than one!
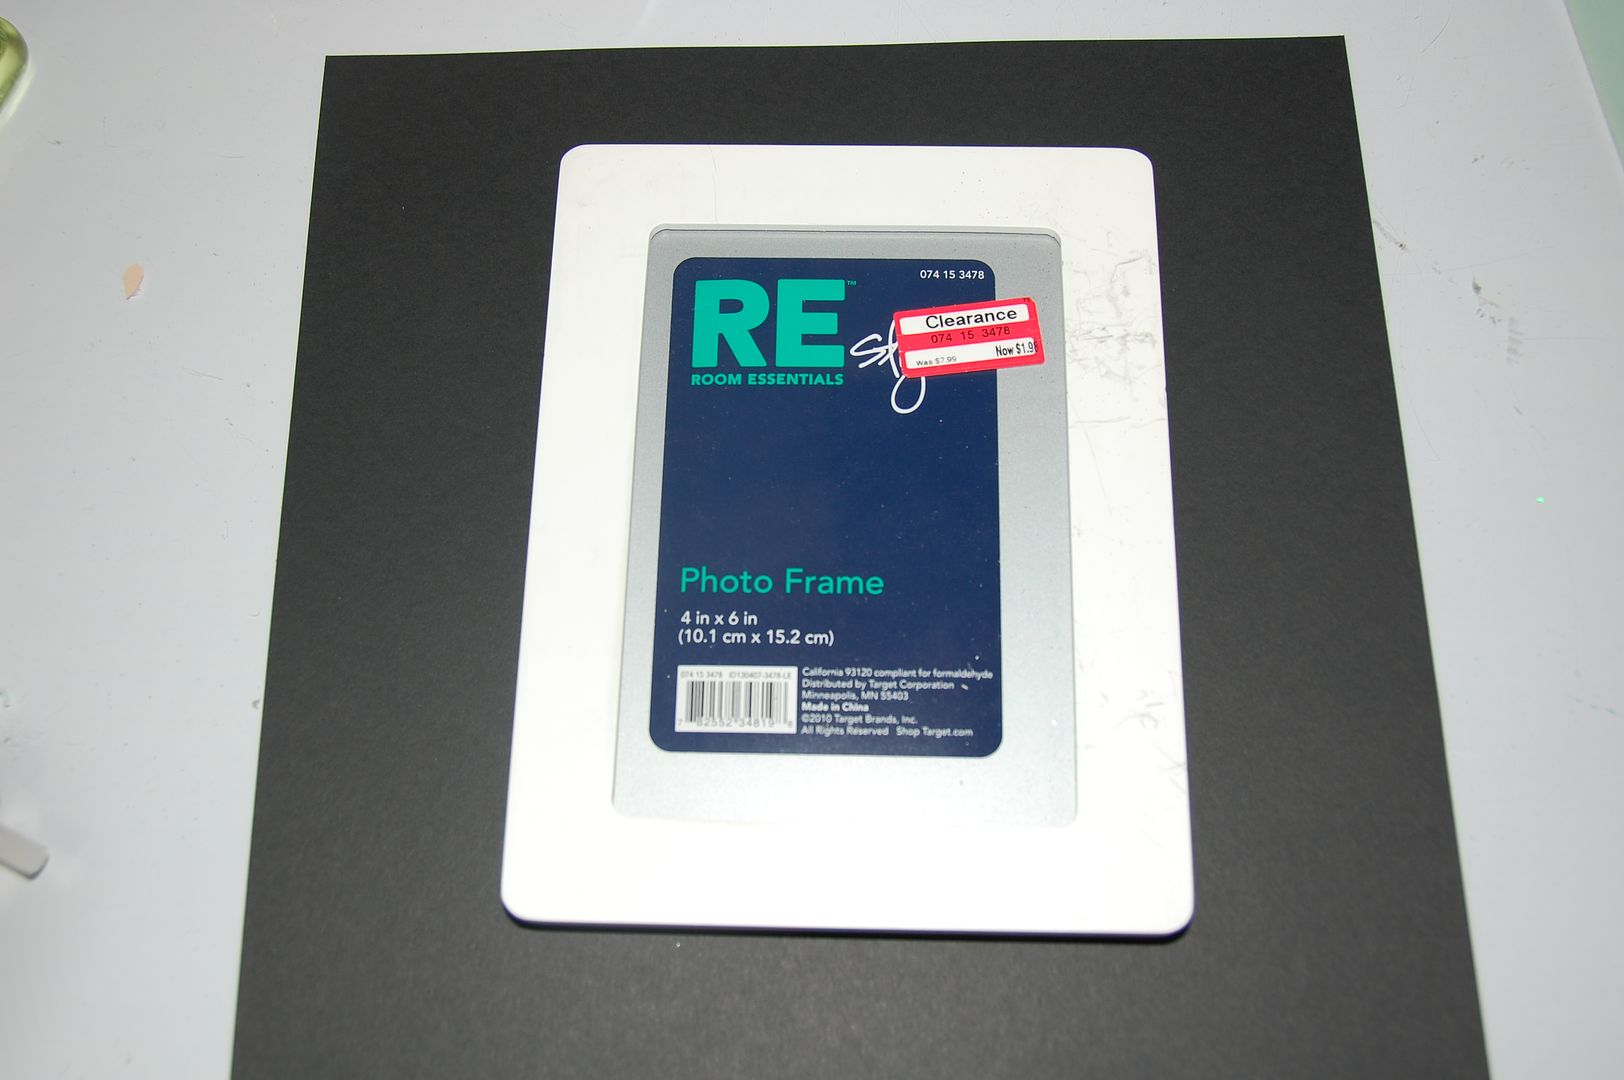
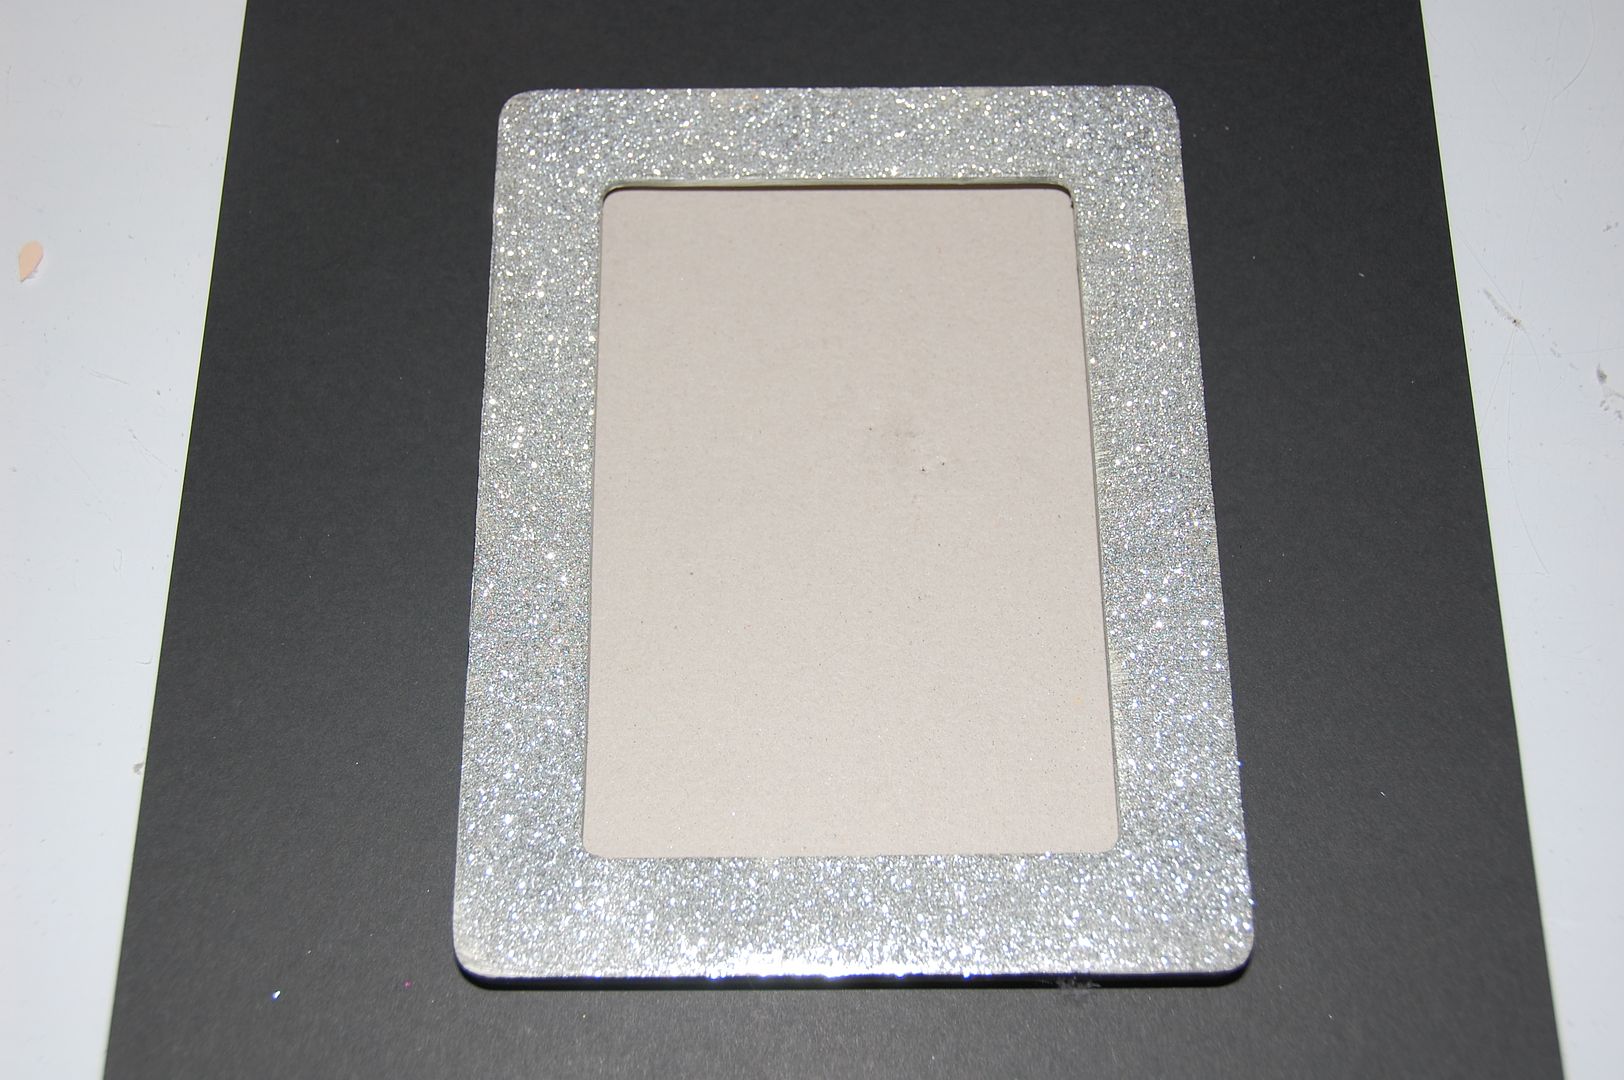
So I bought all 8! I started my taking out the glass and inside fillers.  I painted the frame with a grey acrylic paint.  I let that dry and then sprayed a nice even layer of Permanent Crafter's Companion to the frame.  I then sprinkled Sterling Microfine Glitter from Martha Stewart over the spray.
 Next I used rubber cement to adhere a background the frame.  I cut a piece of black paper sized to cover the chipboard.  Then I cut a peice of purple cardstock and dry embossed it with one of my Asian Cuttlebug folders.  Then I used Ultra Thick Embossing Powder (UTEE) to make the background shiny and smooth. I then trimmed the purple cardstock with sheer green ribbon and placed large rhinestones in the corners.

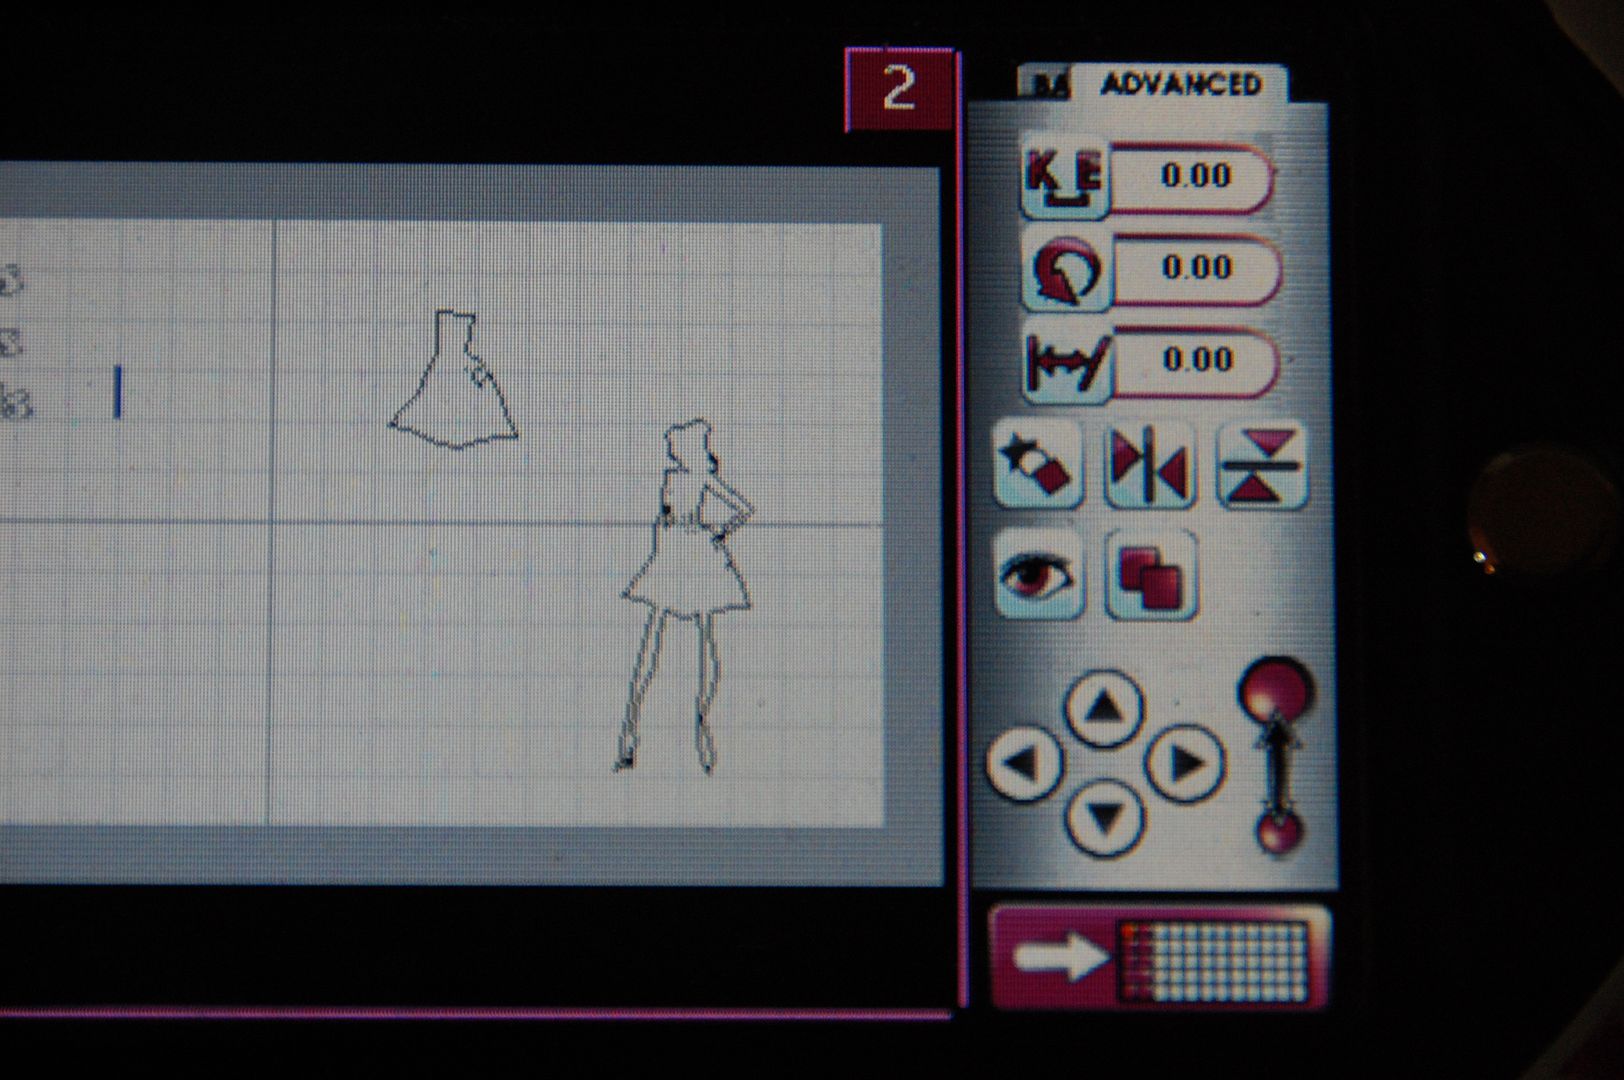
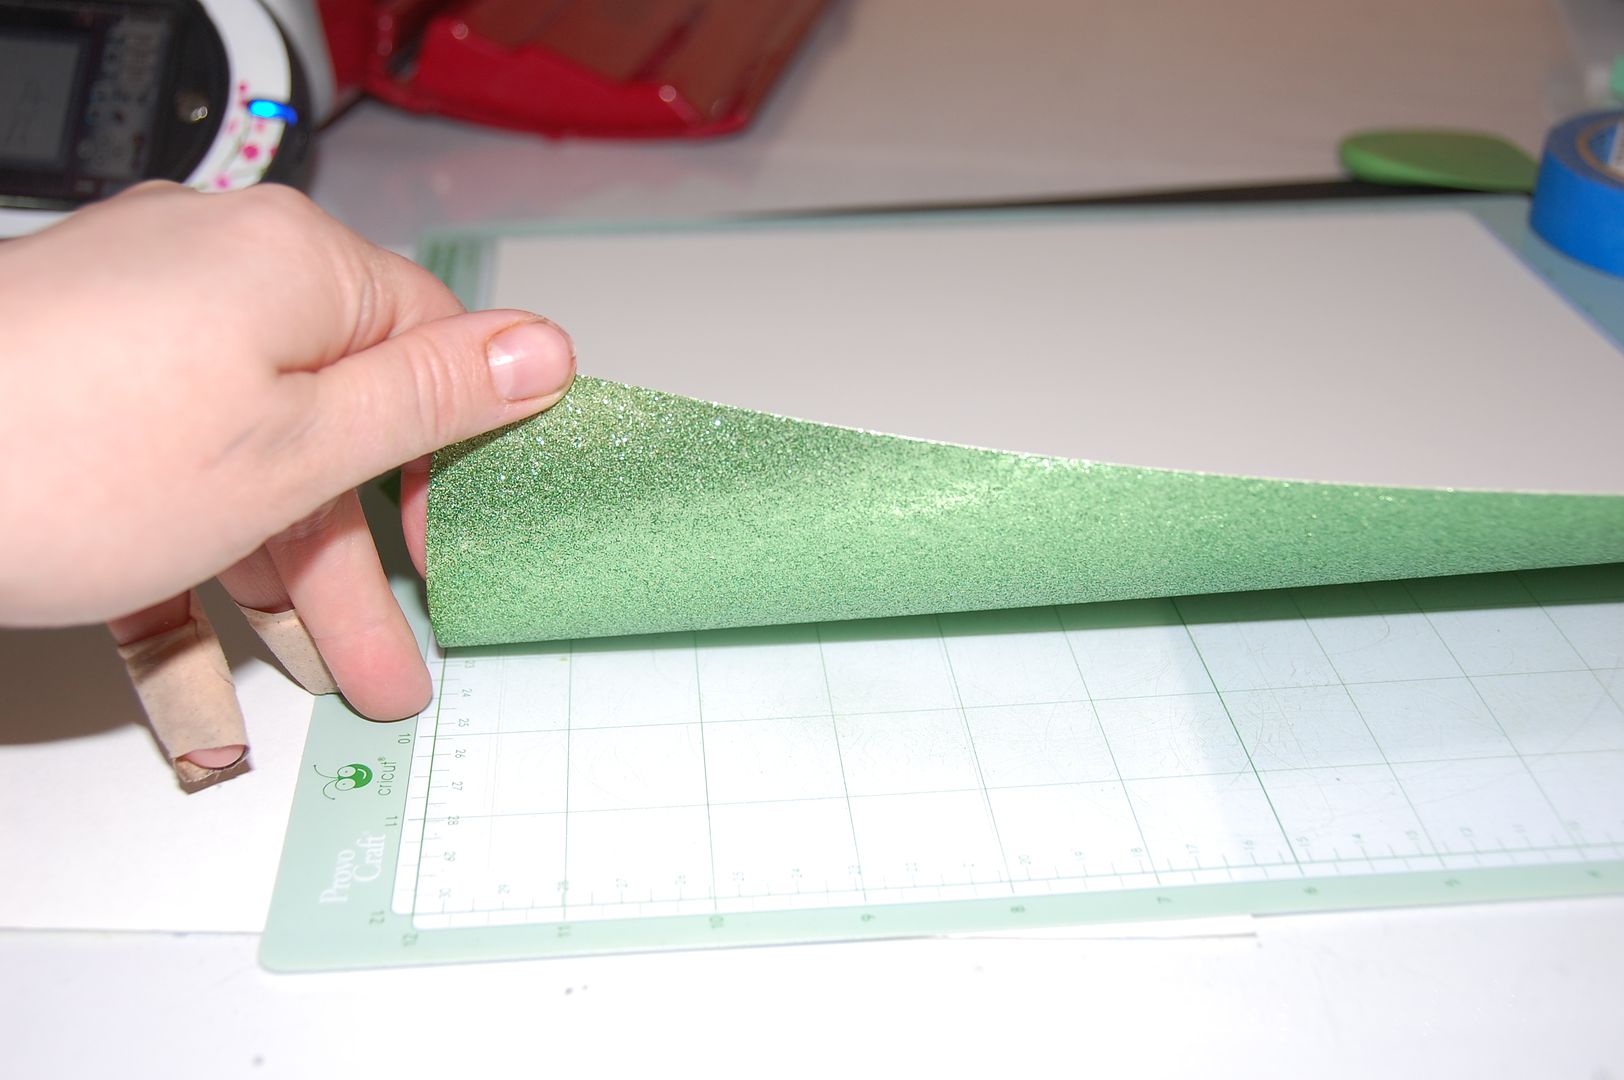
All the cuts for this frame have been done with Button Number 3 on the Forever Young cartridge. This file is 4 pages. Page one is the purse.  It is designed at 1.34 inches. I made a copy and flipped the image. This will allow the purse to have a front and back. The purses are cut from lime green glittered cardstock. 
Once I had my cut I ran the bottom side through my Xyron.  I then placed the backsides back to back, so now I have one piece.

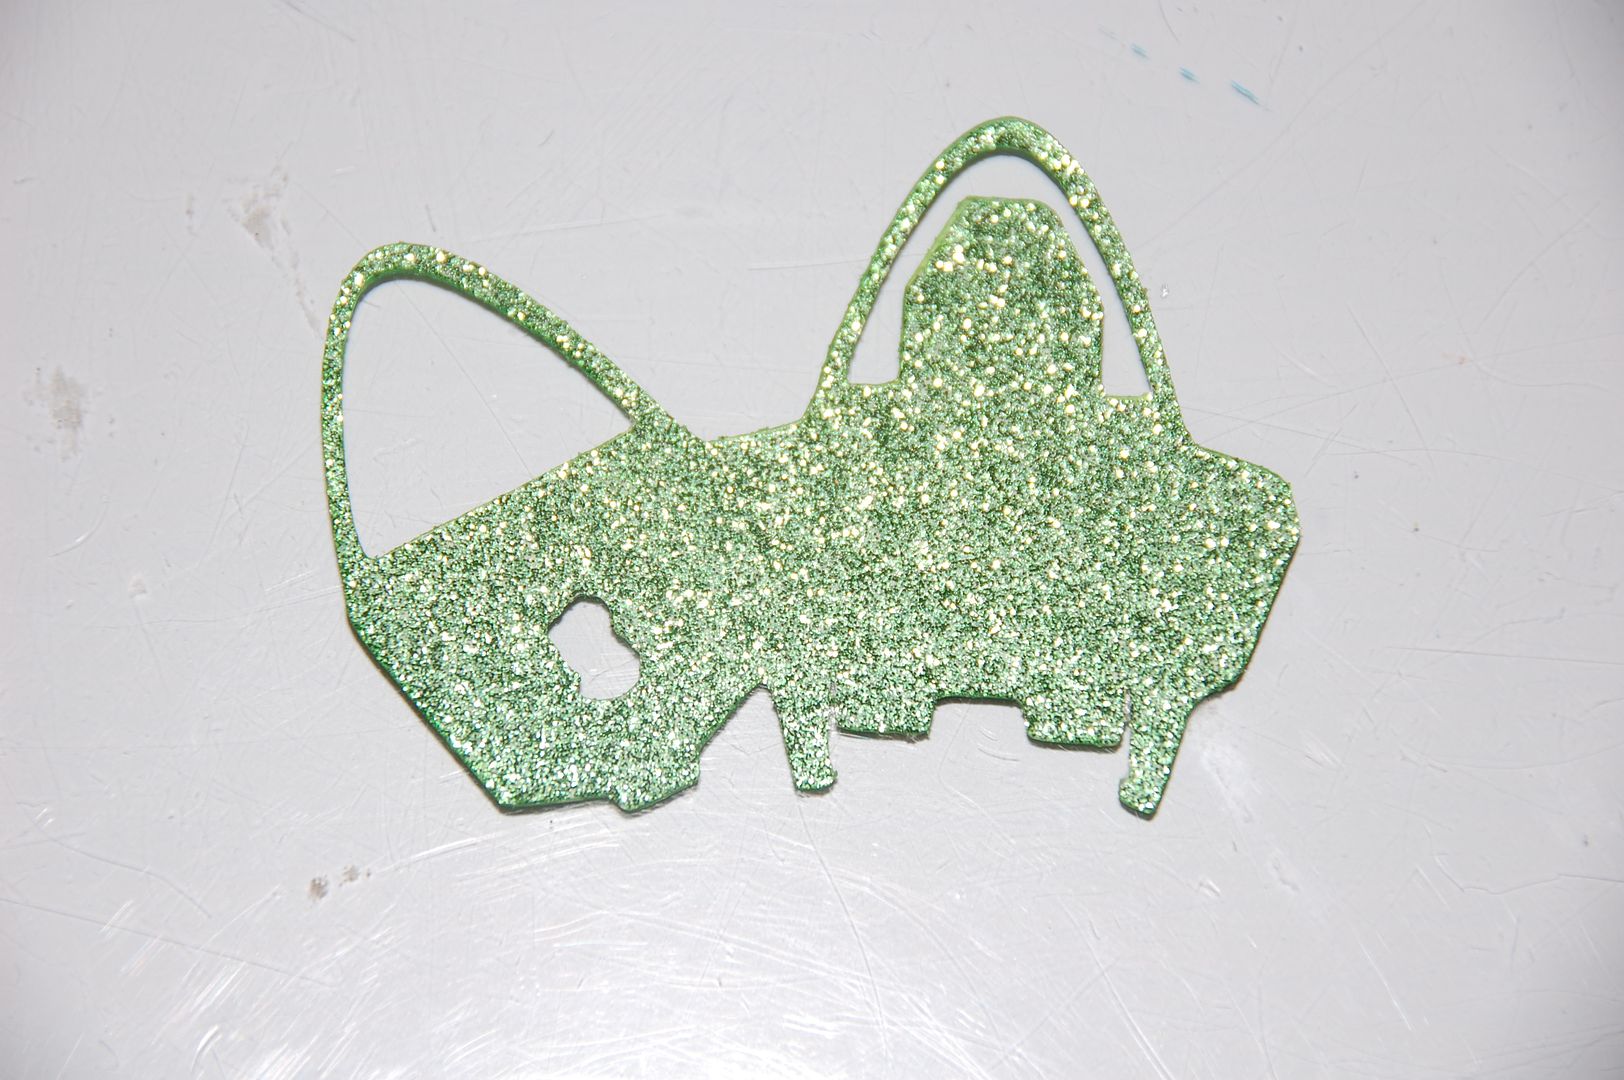
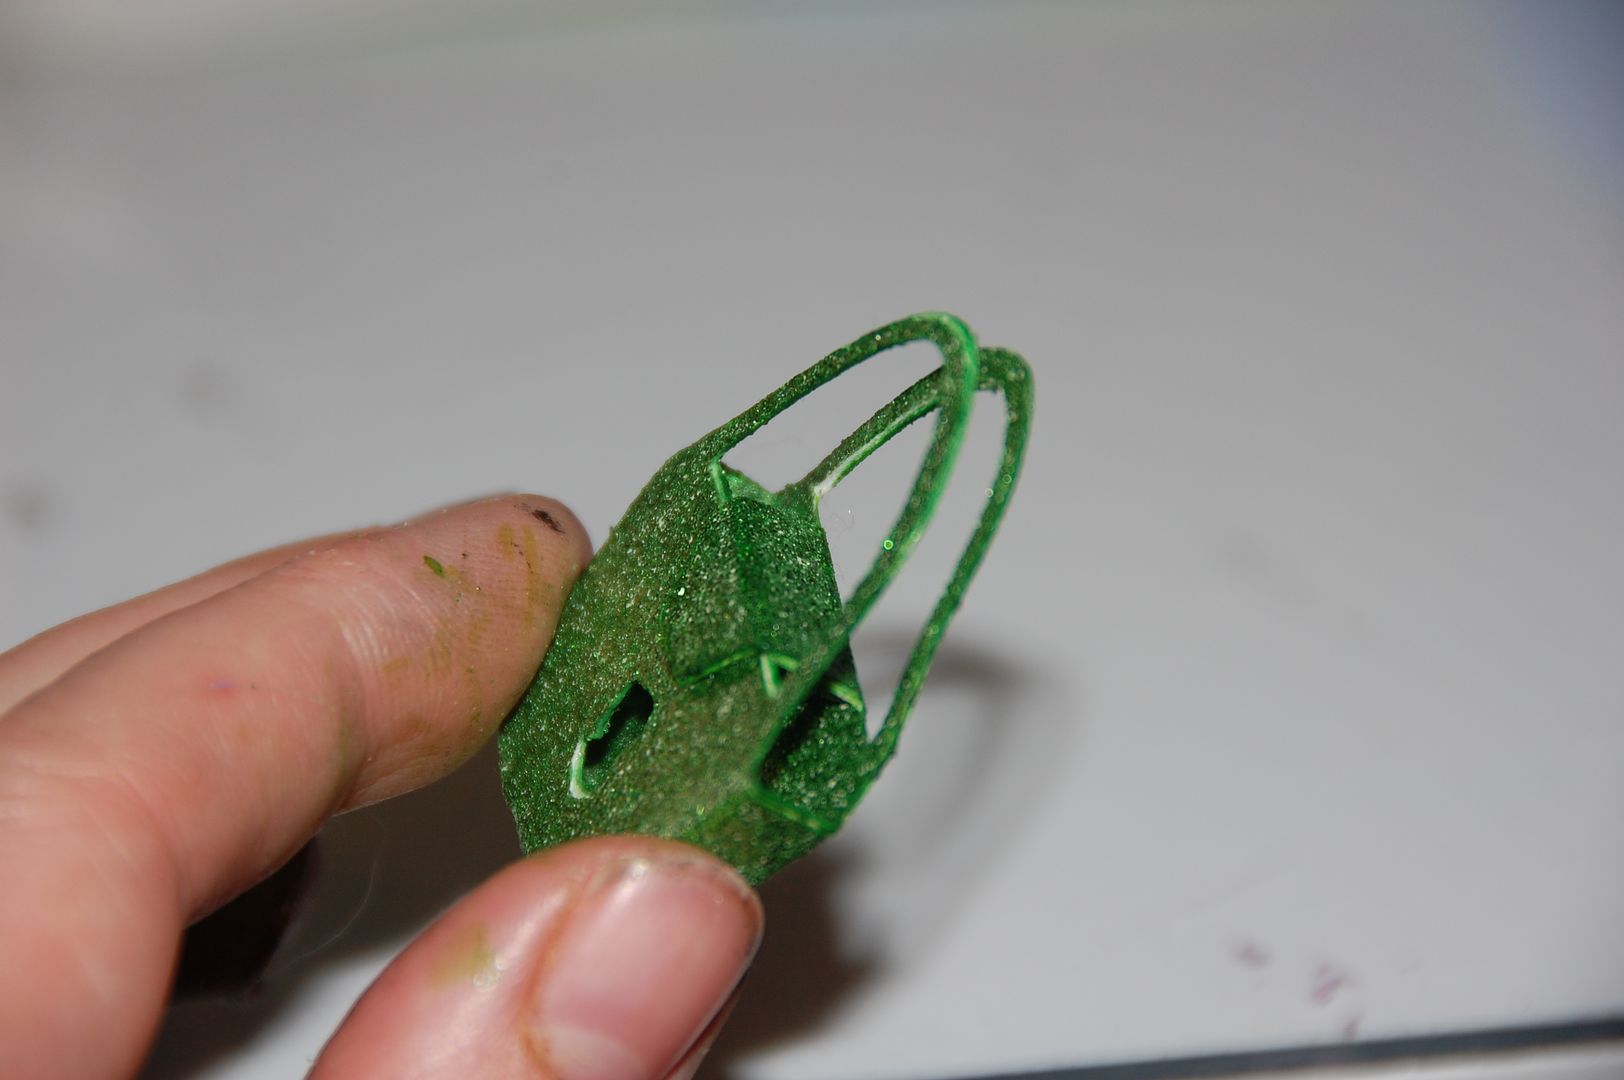
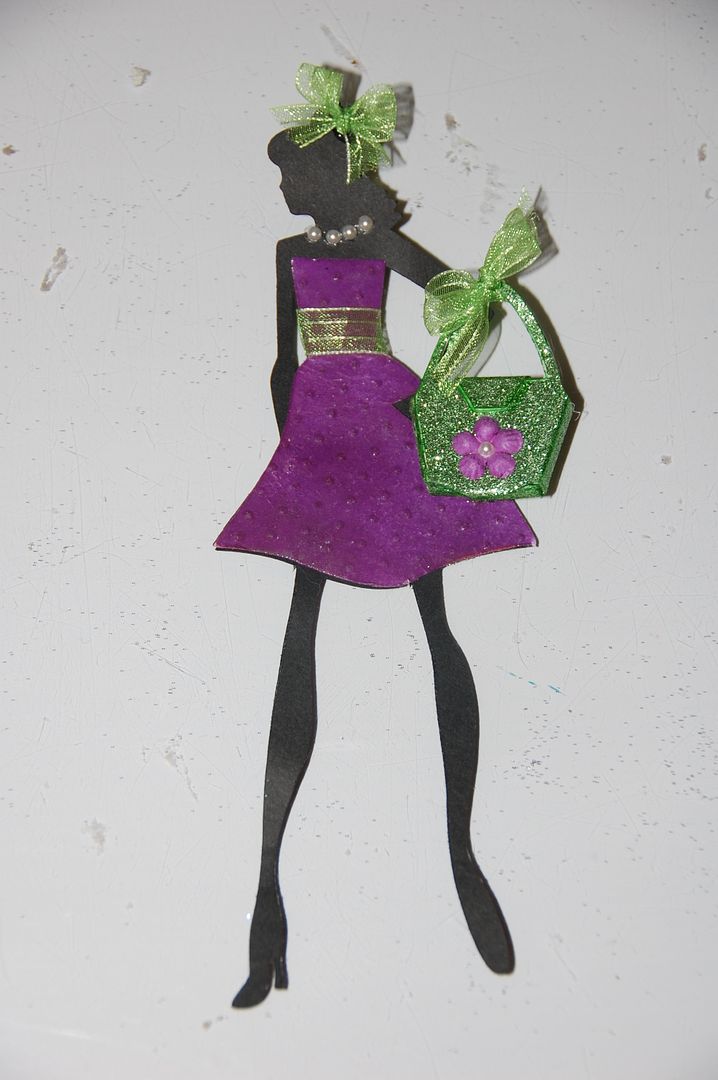
I followed the scoremarks on the purse and used hot glue to adhere the edges together. I then took a lime green Bic Mark It permanent marker to cover the white core of the glittered cardstock.  The finished purse is about 1 inch wide and 2 inches tall.
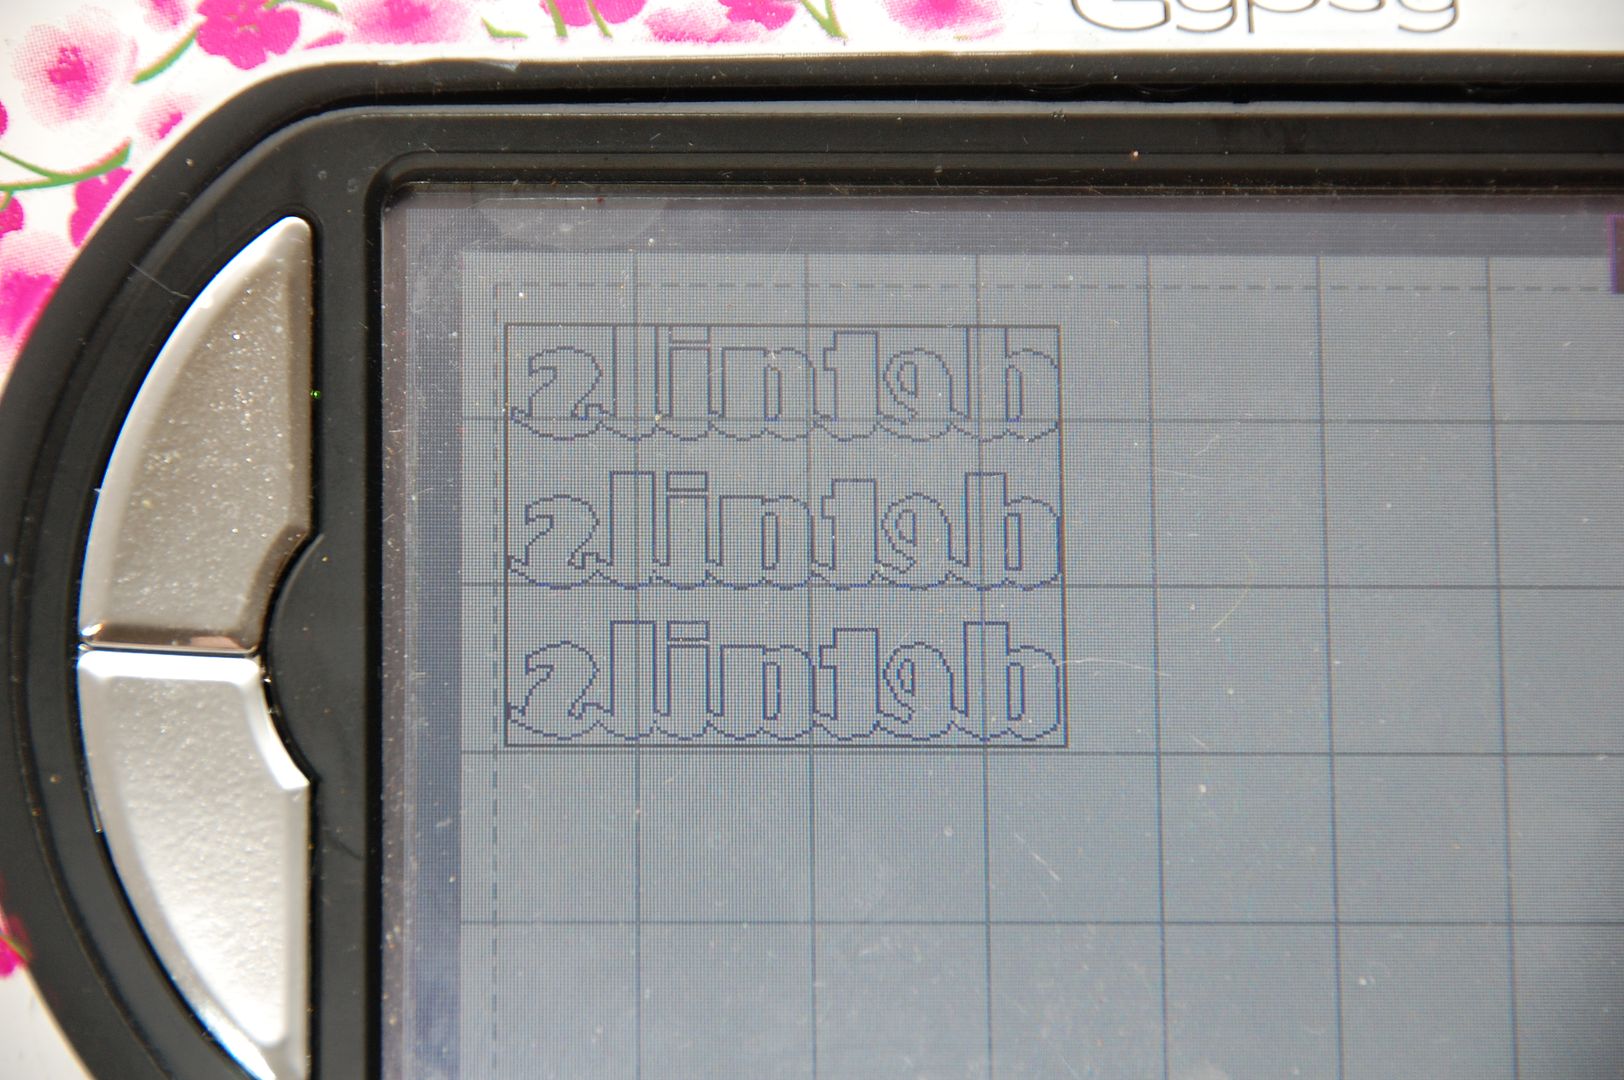
Page 2 is the doll her dress.  The real size is off so the dress and doll will be in proportion. They are sized at 7 inches.  I cut the dress out of purple cardstock and the doll from black cardstock.
Once I had my dress cut, I embossed it with Swiss Dots Cuttlebug Folder.  Then I used 2 layers of Ultra Thick Embossing Powder (UTEE) over the embossing to make the dress look shiny and smooth.I then took some sheer green ribbon and tied a bow for the dolls hair and hot glued it to the cut.  I also used the same ribbon to decorate the dress. In order to slip the purse on the doll's arm, I then cut the hand from the doll
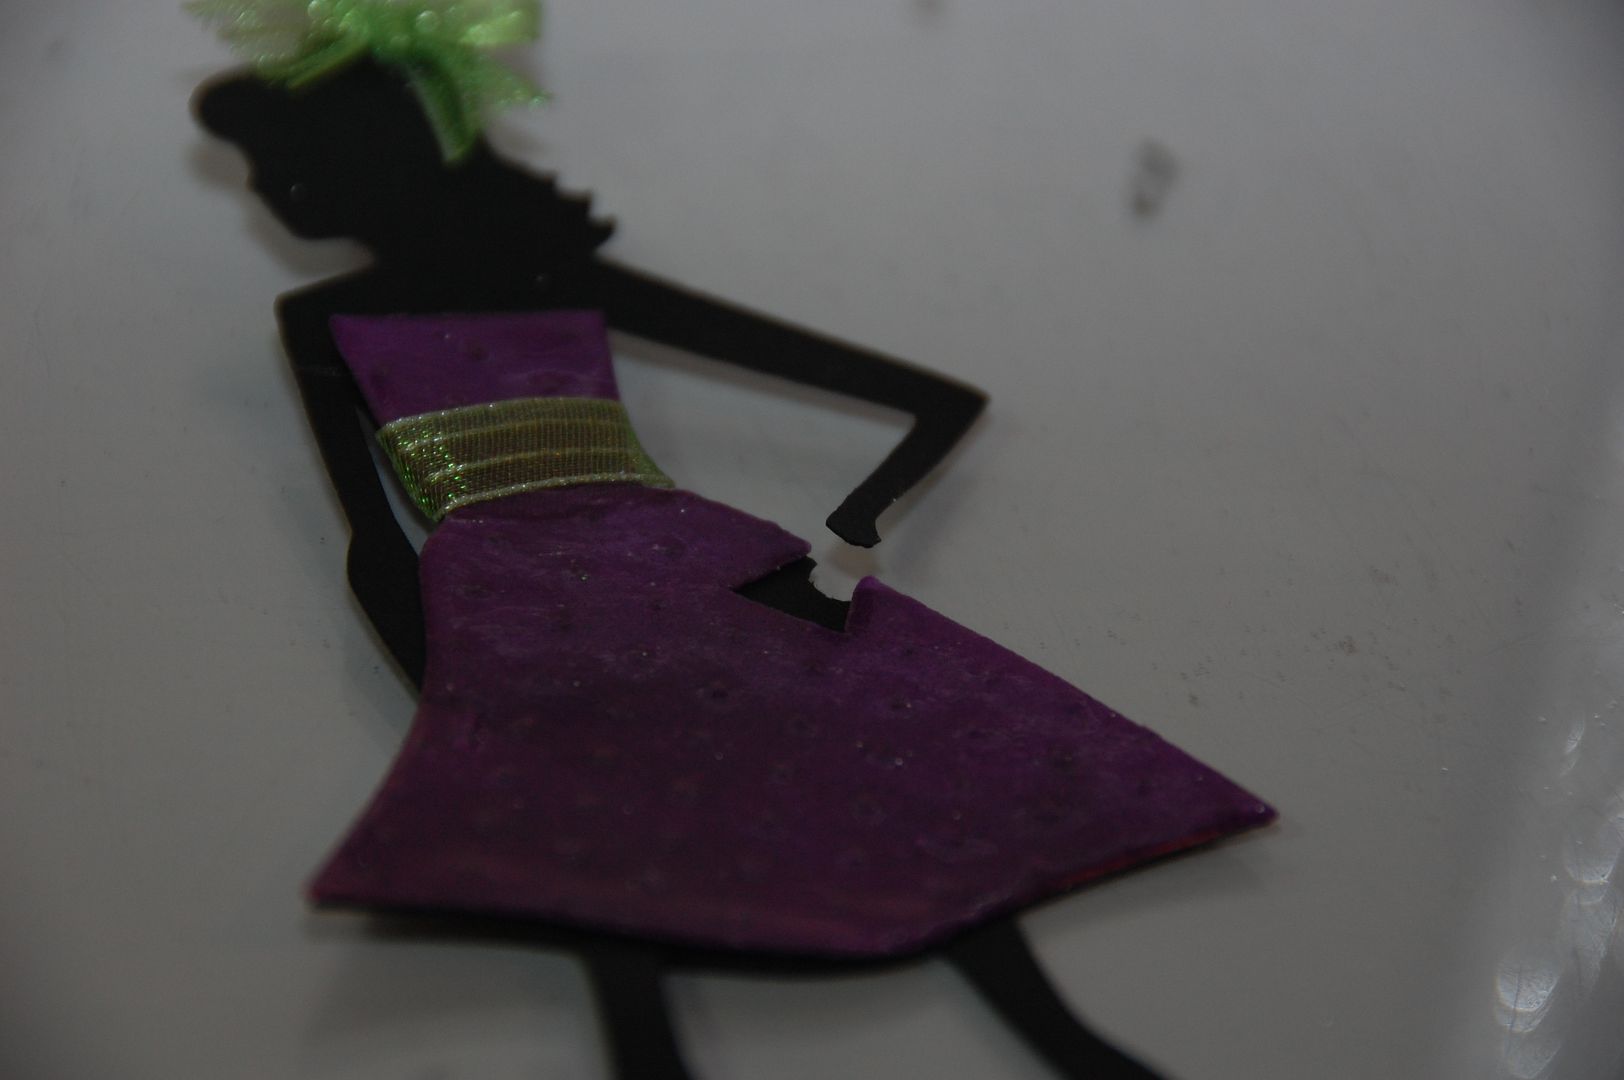
 I slipped the purse straps through the arm of the doll.  I then hot glued the arm back down.  I tied a small bow on the top of the purse to match her hair bow.

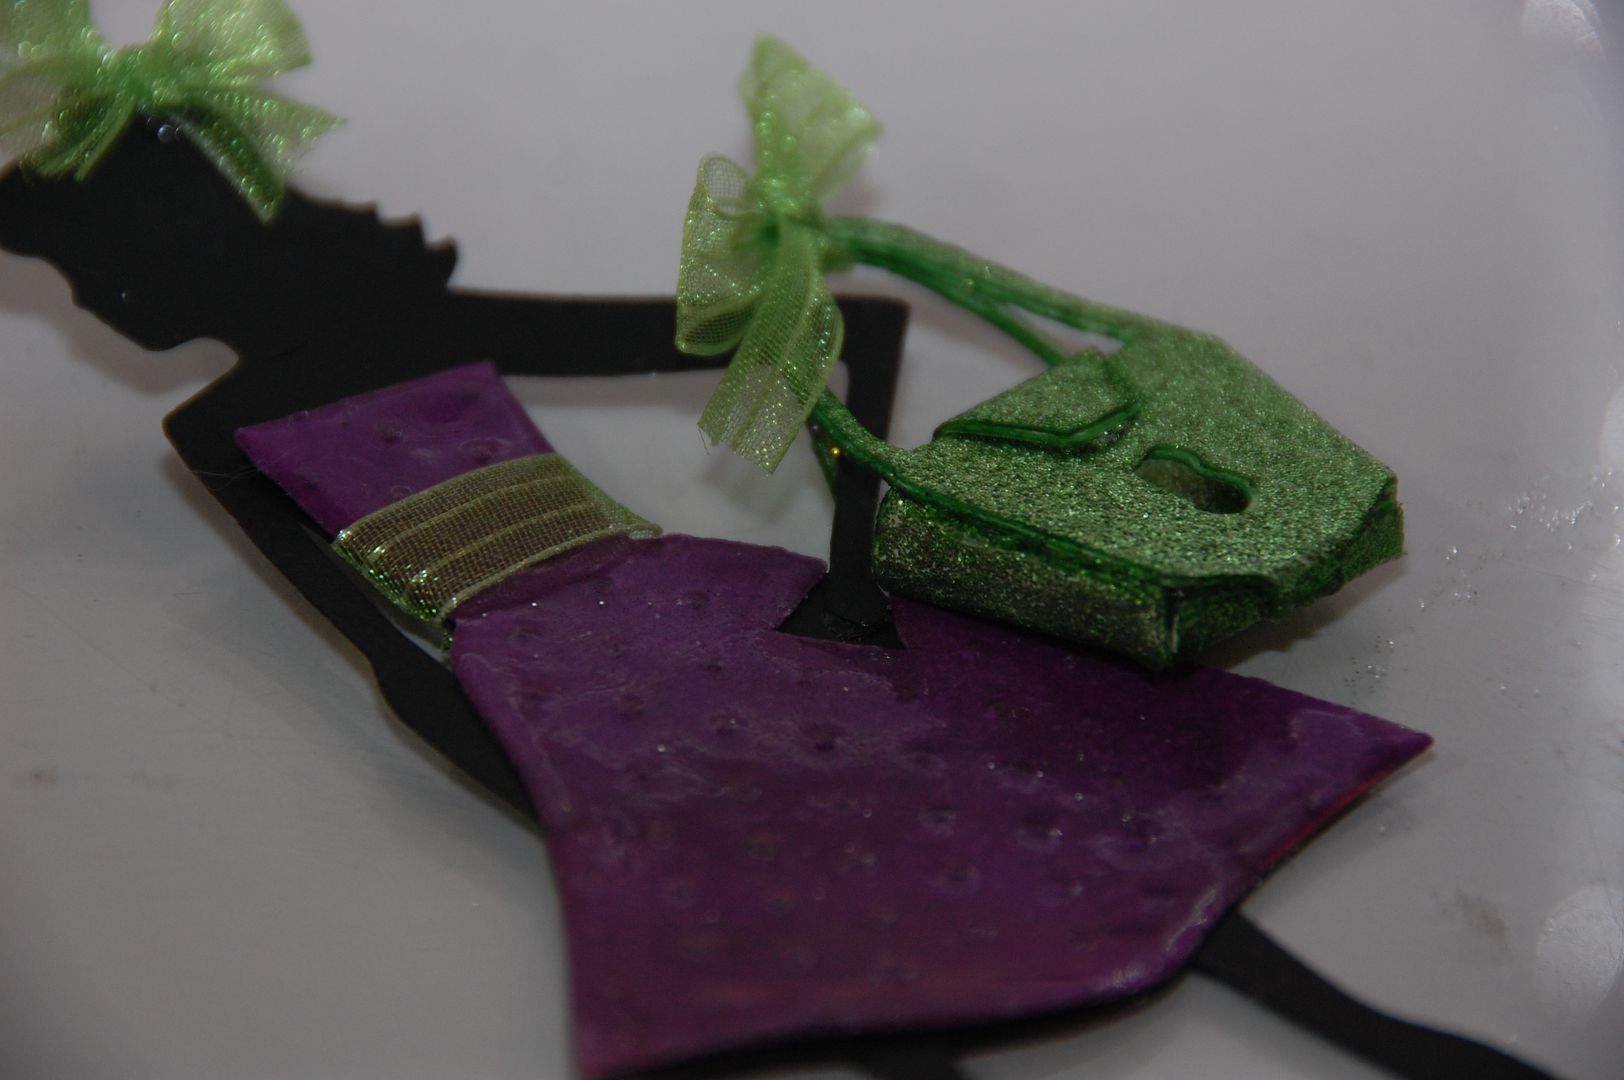
Finally I added some flat backed mini pearls around her neck to create a pearl necklace. I also added a small purple flower to the bag.  I then placed one of the small pearls to the center of the flower.

I cut the word details and shadow at .75 inches.  The shadow was cut from chipboard and the foreground was cut from the same lime green glitter paper as the purse.


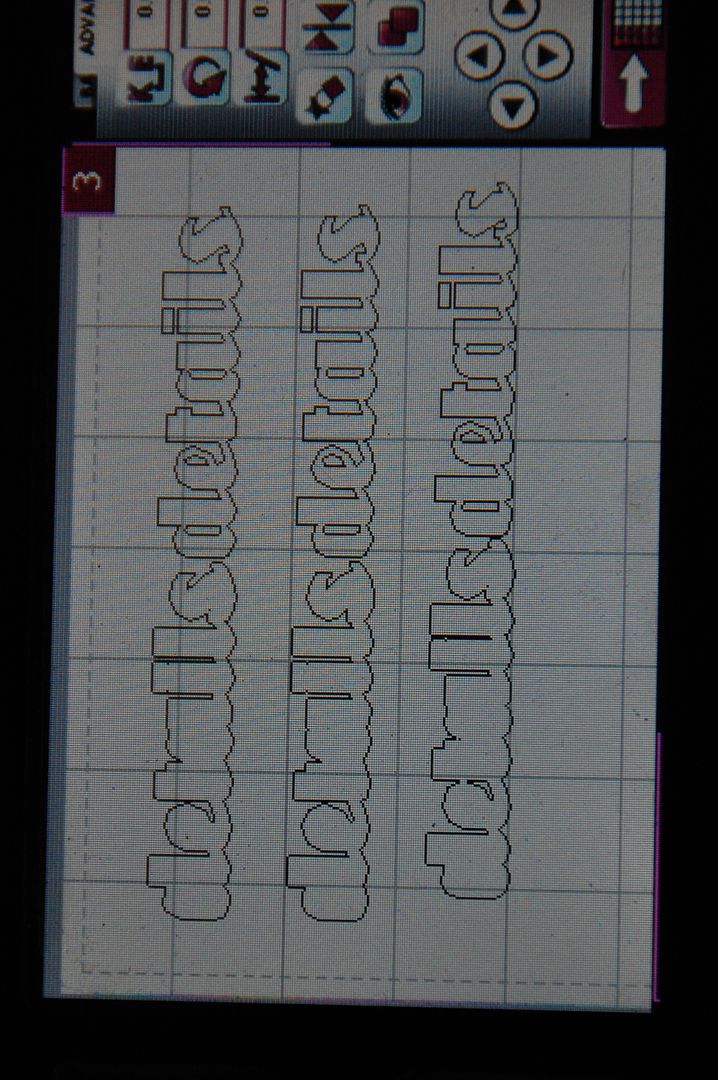
In order to cut the glittered cardstock smoothly, I flipped the wording on my gypsy. 
Then I placed my paper upside down on my mat.
 I painted the chipboard with black acrylic paint and adhered the glittered cardstock to the dried chipboard.
For the flowers and the the strings of pearls, I turned on the the Real Size for the accessories for the cut. I sized them to 1.75 inches out of the gsame lime green glittered cardstock.
I used the mini pearls to the small scallops to make it look like a string of pearls.  I added small purple flowers to the green flowers and also added small pearls the centers.
All my cuts have been hot glued to the frame.  I have left room for a small picture. I realy had fun making this frame. It took a lot of work for the details, but it was totally worth it!
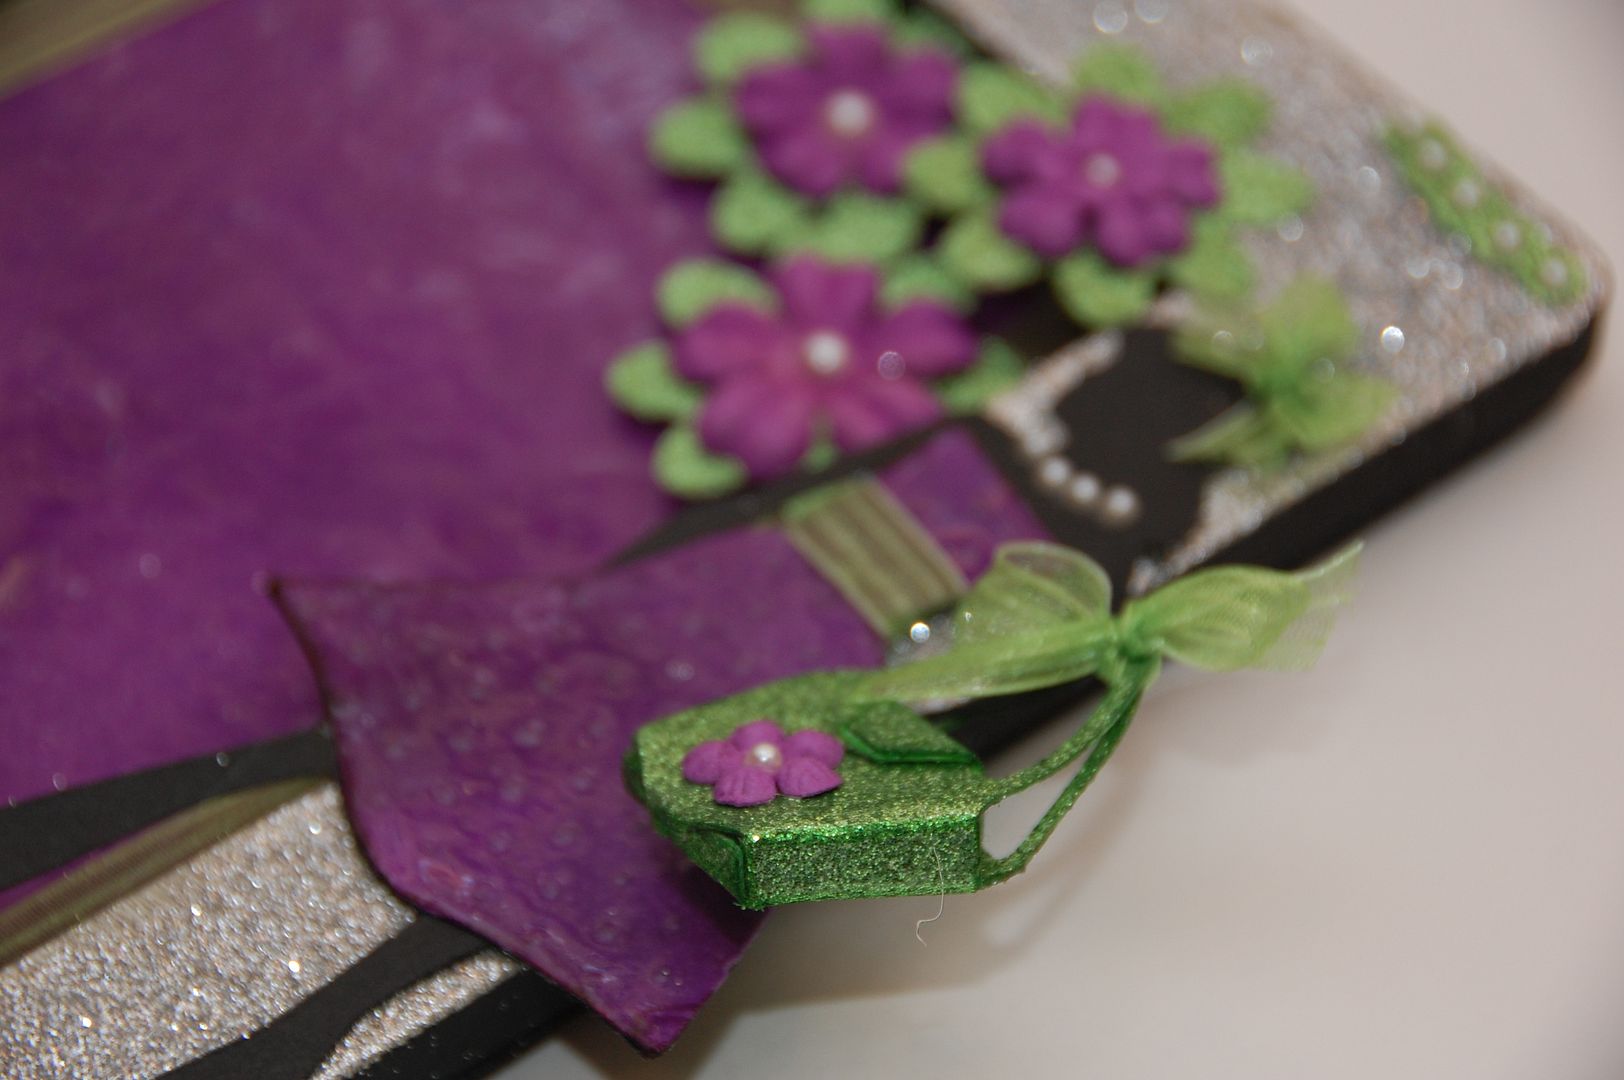
The dimension from the purse is just perfect!
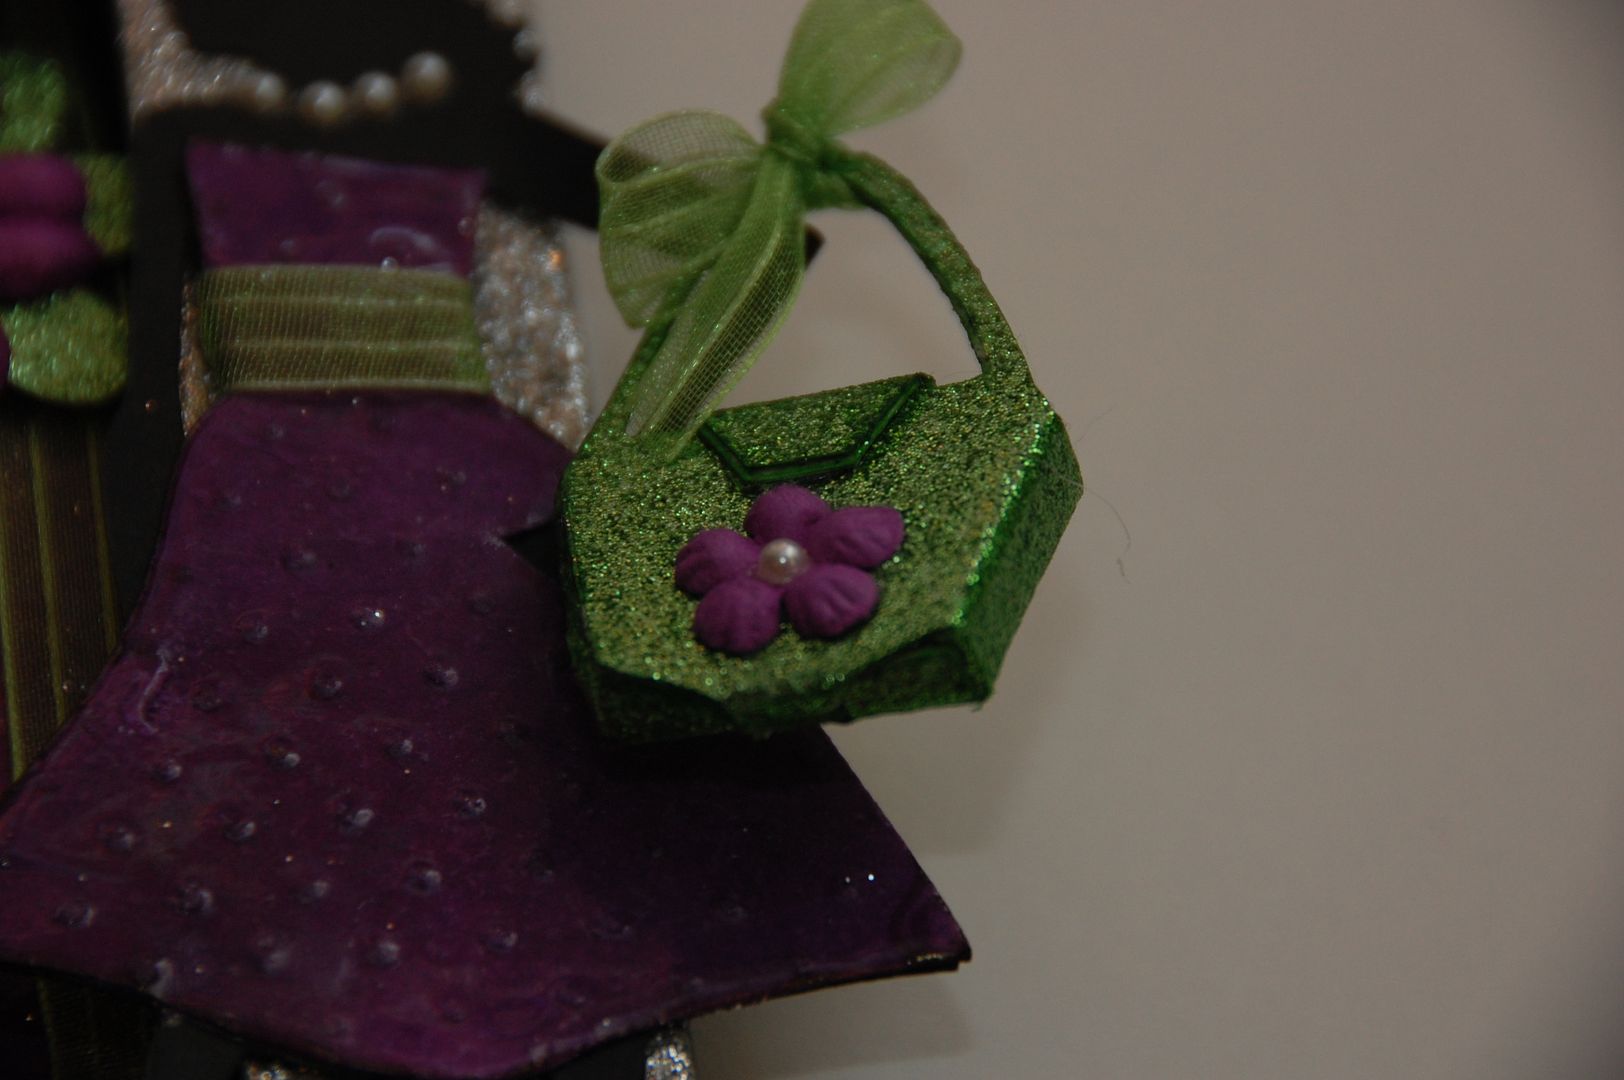
Here is a close up of the bag.  I want one for myself!
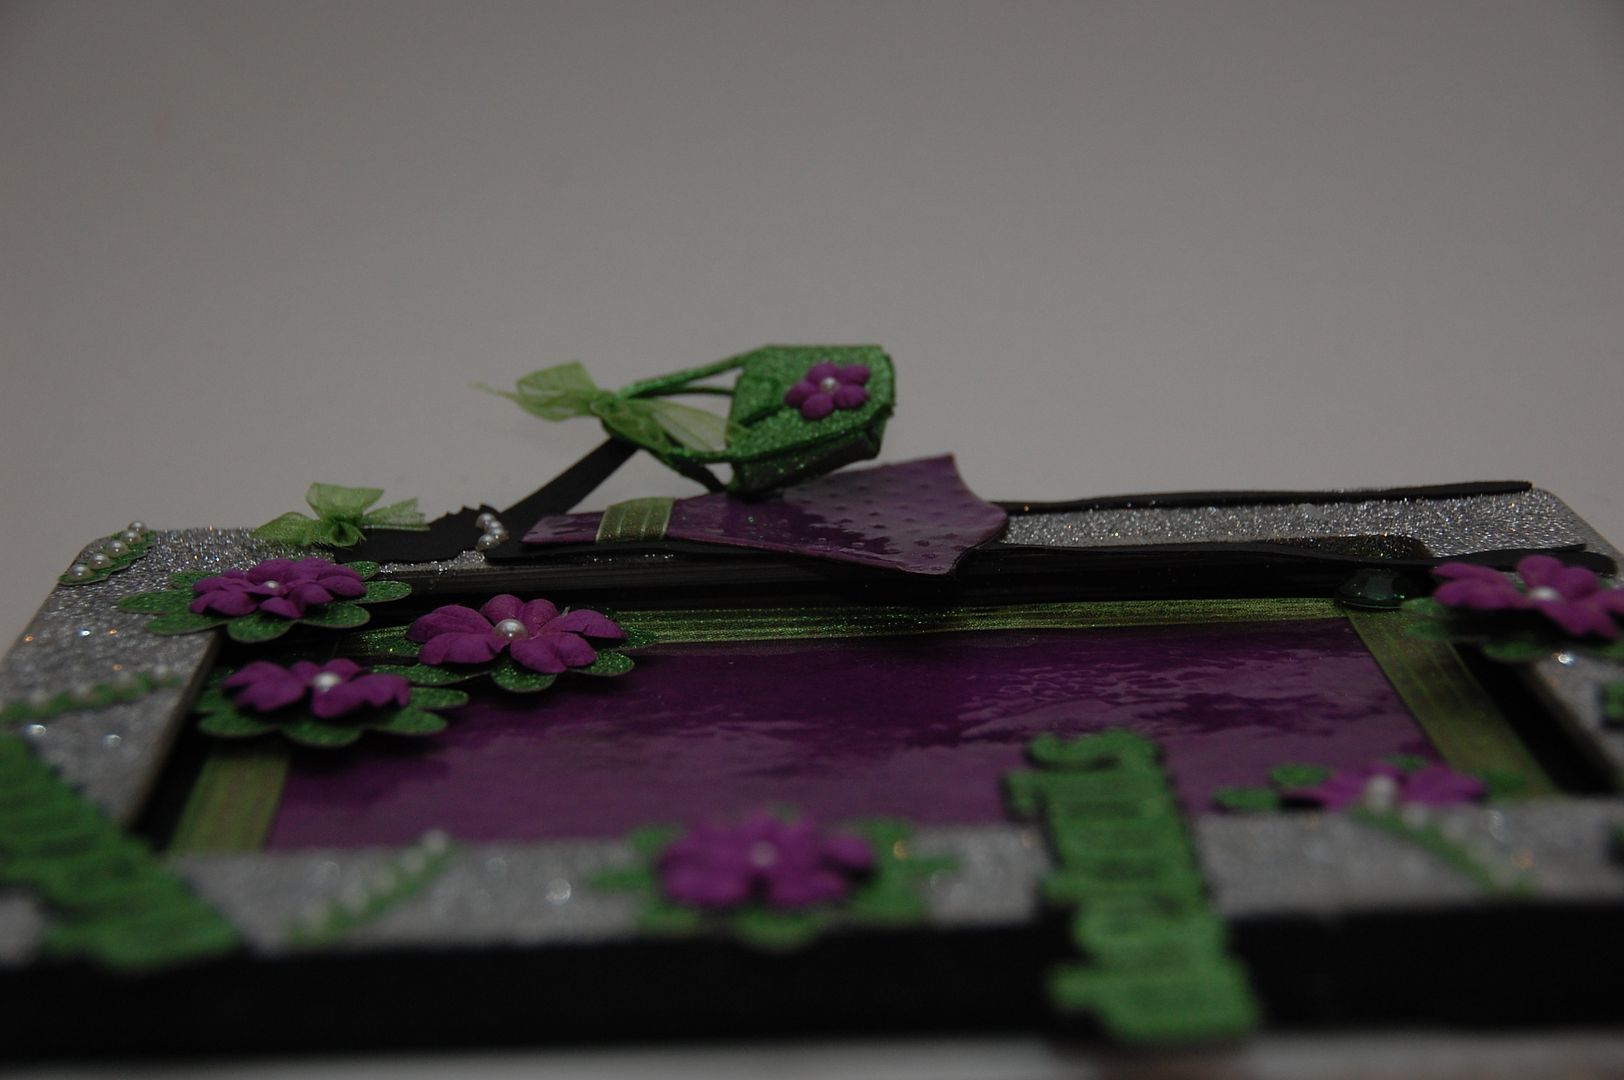
All the layers really work together to create a complete look. By using the same embellishments and paper through the entire project, everything becomes coordinated. Thank you so much for leaving comments.  I love followers too!
The file is available for download at my blog 217 Creations
As always thank you for the comments and also for following!

May 6, 2010

Forever Young Purse With A Little Sass

Well hello everyone, its Sheila from Shes A Sassy Lady, are you ready for a night out.... Well this little purse is just perfect for holding a gift card or two or three for a night out on the town!!! And so easy to make everyone will want to give this rather than a plain old cart holder.
As you can see it looks elegant be it in the day light or evening.
I chose papers from HL's (Hobby Lobby) specialty papers.... I always stock up when they are on sale. Be be prepared as they are hard to cut and hard to glue on. It takes 6 cuts on a #6 to do the job. When you are done pull off the blade housing and clean it out so your blade will cut properly next time you use it.
Here is how it looks on my Gypsy I didn't alter anything with the design but I did add the little rectangle so the bottom of the box would be covered too as it really has a nicer or more completed look. I think I used George or Gypsy Wanderings for that.
I used the accrylic from the cart box to make the sunglasses.
This glitter paper is almost impossible to get something to adhere to it. I find this Zip Dry works the best yet even with the Zip Dry be very generous with the glue.
The first thing I did after cutting was score the purse.
After scoring I adhered the outer laver of my purse.
I really want you to see how heavy I put the glue on becasue it really is a mess to try to reglue later.
After I glued the pieces on I used a crystal candle holder for the weight and let it sit for 10 minutes as I wanted it good and dty.
Then I put my inside pieces together as shown and applied glue to it and drew up the side to it and held while it dried... I did that while I was on the phone...
Then I added my beading and viola, it is done! How easy is that? And doesn't it look cute?
I think the sunglasses give it a finished look!
MyFreeCopyright.com Registered & Protected
I hope you liked today's little project from the Forever Young Cart. This is one little purse that I will make over and over and I hope you do too. I did not offer a cut file as I did not alter the file at all it is button 35.

signature

May 3, 2010

"The apparel oft proclaims the Man"

 - said Shakespeare. or woman in this case... So we women will do that in our style and remain Forever Young with these purses.. from Forever Young cartridge of course.


 This purse is from the purse found on the first button Pg 24 in the cartridge book (not the online version).
This time around I made just one and I used 12 x 12 papers as I was too sick to go out and buy larger sheets to use on 12 x 24 mat.
 Tricking the mat to 12 x 24 was still small so I set the cursor height initially very high  like 20 inches ,added  the image and then reduced it to the height I needed.  Remember when doing this we can reduce size but cannot increase it back . If we need to do that then we have to start over again from the beginning.

Here is a video to show only the gypsy file portion and the tricking part. Assembly is in the photos as I was too sick to cut another purse out :)

 Part 1


Part 2


Here is the view of the page 1 of my Gypsy file


Page 2


page 3


page 4


I used metallic shimmer paper for cutting pages 1 to 3 and pattern paper - a DCWV stack - I think green stack or mariposa not sure.. for page 4.
I scored all the score marks. I did not weld the shapes from page 3 onto the purse to cover up the girl as that would have erased my score marks and I needed them and anyway since I am covering over it did not matter.
Even though the images are exact shadow and can be added as layer I reduced it a bit after unlinking the height and width as I wanted some of the metallic brown to show.
Here are all the pieces cut and scored


I glued the rectangle slightly down to get the correct width and then lifted just the edges aligned the side pieces and glued and pressed down everything. ( glued with ATG gun)


Then I folded the sides , inserted like shown in the image and glued them down with zip dry. You can also
use glue dots


Then I pasted the pattern paper.


There is a slit in case you want to close the buckle. If you want the closure this way then take a craft knife and slit from inside so that the pattern paper gets a slit too like in the picture below but I like the Velcro closure so used Velcro for actual closure


I then took a decorative button cut the shank off and glued it on the buckle, Then took a ribbon which had stictching - it's art blanche from EK success - so used that for the bottom and sides.


The rest of the places I outlined stitches with white opaque gel pen. Used some bling swirls from archiver's.
I also made a tag using plain blue card stock, some stickers ( I think 3 birds or ones I got from Tuesday Morning) . I took the blue glitter slice tag and traced the circle - used old fashioned scissors - ha ha to cut the circle. Centered the sticker flowers and then cut . I also cut 2 circles  from acrylic sheet from the cartridge pack ( I save them for such purposes) and sandwiched the cardstock between them and slid them ino the tags and used the Tag tool to crimp it.


I then punched a hole with cropadile and then threaded a fabric string through. Added a xoxo button also and blinged the center with a stone and tied it around the handle. If you want to add some words do it before crimping the tag.

So here is my purse - front


back


and side


Hope you enjoyed watching. Can't wait to see you all be "proclaimed" by your "apparel"