Knowing is not enough; we must apply! - Johann Wolfgang Von Goethe

Welcome & Copyright & Disclaimer

Welcome to Tuesday Treats. Hope you have a pleasant journey browsing and getting inspired by the projects you find here. We appreciate and treasure your comments so please leave us some blog love and comments. But before you start your journey here just a small note . Do please read and then you can continue on. Copyright: This blog has a many designers showcasing their projects. Please look up their individual site to check their copyrights for any infringements. My files & projects are also all copyrighted. They can be used as inspiration and for personal gifts only but cannot be used in classes, in magazines or for contests. Please look in the side bar for more details on the copyright. Disclaimer: The designer's designs belong to them and them only & not to TuesdayTreat and The TuesdayTreats will not be responsible or liable in any way for any results or consequences from those designs.

January 25, 2011

Valentine Shaker Post It Holder

Hi everyone! It's Allison from Goody Bag Diva and I am thrilled to be here for the first time at Tuesday Treats! Thanks so much to Pam for having me!Today I have for you a little Valentine's gift for your colleagues or maybe even to leave on that special person's desk this Valentine's Day.

This project combines two of my favorite things - a shaker card and a post-it note holder. It uses only two cartridges - George and Basic Shapes and this beautiful scalloped heart was a hidden treasure I found on Gypsy Wanderings.

I began with a rectangle from George - the first step was to unlock the width and height and turn on the real dial size button. Then I set the dimensions at 7.75 width and 3.50 height.  After cutting, I scored at 3.5 inches and 4.25 inches. I also used an exacto knife to make two little slits for the pen.


Then I began to work with the top layer of patterned paper that would have the heart cut-out. Before moving on to the heart, I selected another rectangle from George (and keeping Real Dial size on plus width & height unlocked) I made it 0.50 width and 3.50 height. Then I copy and pasted it three times, rotated two 90 degrees and formed a square with the four rectangles. In case that sounds confusing, take a look at the picture. Now don't forget to lock the width and height button before moving on!


The scalloped heart is under the tag function on Gypsy Wanderings (2nd row, 8th button). It is at 2.71 inches high, and I centered it to slightly overlap in the inner square formed by the rectangles. Then I welded all of the shapes and also grouped them.

For the center of my layer, I used the shift key which is the scalloped heart with a center cut out.

Then I used the hide contour feature to hide the scalloped line.


I sized it at 2 inches.

Then I moved it over to the center of my group. It does NOT need to be welded because I want the heart to be cut out.


And just to make sure I was doing it correctly, I always check with the preview button.


The final step before assembly is to cut out a final top layer in red of the scalloped heart with the center cut out the same size as my original heart (2.71 inches). I also ran it through my Cuttlebug using the Swiss Dots folder.

For my layer of clear plastic, I use the clamshell from my cricut cartridges - whenever I get a new one, I simply cut apart the clamshell and save the pieces of plastic. They are perfect for shaker cards! I just cut a square at just under 3.5 inches high using my paper trimmer. Then I adhere it to my top layer suing ATG tape and then back with Scotch two sided foam tape.

Then I carefully fill the center with some Martha Stewart heart glitter, peel the plastic off the tape, and lay down the front cover of the holder on top. Don't forget to add the top outlined heart layer to the front.

Then I added a little pen I picked up at Walmart and adhered pink post-it notes to the inside and my little gift is ready to go!


I would be happy to share the gypsy file with anyone who wants to send me an email. And although it is a little early, have a Happy Valentine's Day!

January 18, 2011

Hey Fish Lips!

Hi!  My name is Michele from greengirlscraps.  This is my first time on Tuesday Treats and I am very excited to be here!  I wanted to share something that I do for titles and other words on my pages.   Often times, I want to use my Cricut fonts but I don't want to deal with gluing all of those letters down!  So I'm going to show you what I do instead.
This layout is from one of our many fishing trips last summer.  My family LOVES to be on the boat.  Our youngest daughter is 1.5 at the time and we taught her to kiss the fishies before we toss them back.  Sometimes she would do it and sometimes she wouldn't, but it was always fun to play the game! :)

First, I design my titles on my Gypsy.  Here you see that I created my title and my two sub-titles, I'll call them.  This font is Pooh Font, Marker style.

I make sure when I type out my titles that I type the entire thing at once:  "Hey Fish Lips!".  This is probably the only time I ever use the space key on the Gypsy but it really helps to keep everything lined up.  I then use the kerning and the arrows to move everything to be perfectly spaced.  For this particular title, I also slanted it 0.20.  I've found that when you slant your letters, you have to go back and fix the spacing more often. 

Here, the yellow highlighted circle is showing you the tilt of the letters at 0.40.  These will form the corners of my page.

Then I cut it out!  So that I don't have to deal with all of the letters, I use the negative cut.  It's so much simpler to deal with adding in a few dots for the O's and A's, rather than worrying about getting the title straight and correctly spaced out.  I know this won't work for every layout but for some, it's perfect! I cut this with my Imagine, as I find the cutting is so much more accurate.  Here are the letters cut out (which I won't be using):

And here is the negative cut that I will be using!

I chose another paper to glue to the back so the letters are still another color/paper choice.  Here you can see the back of one and the front of another. 

One more Gypsy item that I'm sure most people are aware of but if you are just cutting with the Imagine using the Gypsy, you can still place the paper wherever you want on your mat.  Here I put my Gypsy in the middle of the mat to show you how I lined up the layers of the fish I was cutting and the fishing pole (both from Camp Out Solutions cart).  Like I said before, I think the Imagine cuts with more precision than my Expression and I love it! 

 From there, it's assembling the layout as you normally would! Here are a few details of my project.

I tore the title and subtitle paper to make it not so linear.

I used Glossy Accents on the fish to give it some dimension and some slimy scales of course!

I wound fishing line around my fishing pole and, although it's hard to see it in the pictures, the line goes from the pole and catches the fish's mouth!

Here's the picture of the full 12x12 layout again. 

Thanks for visiting Tuesday Treats and reading my first ever post here!  I'd love to hear any comments you have!

Thank you,
Michele from greengirlscraps

January 11, 2011

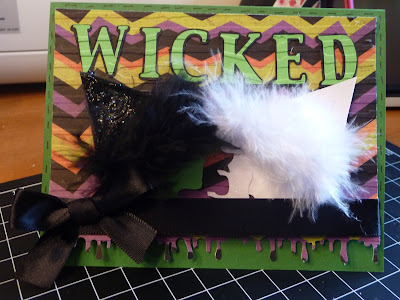
Tuesday Treats 1-11-11 Wicked Birthday Card

Hello everyone, this is Jenny from Jenny K Scrappin Addict at http://kozfam5.blogspot.com (I really could not think of anything too creative with the name so this works - hahaha!!). I am new here to post at Tuesday Treats and was just so excited and yet nervous. The ladies that post here are just so talented and I have learned so much so I wanted to share my craftiness as well. 


My project is a Birthday Card for my daughter. The last couple of years for her Birthday we have decided to see a Broadway Show and go to the Cheesecake Factory for dinner (YUMMO!!!). We are going to see Wicked this year and I wanted to make a card to match the poster for the show.


I laid this all out on my gypsy and there are really not that many cuts. Here is a picture of my gypsy girl:


See - just 5 cuts. I will provide the complete recipe below. 


And here is my finished card:


I used 4 different cricut cartridges here:
Base Camp for the lettering (cut at 1 inch with the layer)
Sentimentals for the hand (cut at 1 and I also removed the envelope)
Mini Monsters for the hat (cut once at 4.35 and then flipped and cut again)
Forever Young for the faces. I used the Emblem feature and hit the circle on my gypsy so that only the faces were cut. (cut at 3 once and then flipped and cut again) For this cut I removed a flip on the front of the hair and the neck.


On the lettering and my background paper I used the Distressed Cuttlebug folder. The background paper is from the K & Co. Seasonal paper pack. The green and black paper are from TPC and the white glitter paper is DCWV. I used Black Diamond stickles on the black hat. The feathering on the hats are boas that I cut down and then glued (I saw Emma on My Creative Time do this on a CUTE card she had made previously and knew I would be doing this at some time). I used the Martha Stewart Drippy goo punch and some black ribbon from my stash.


Well I hope you enjoy my card - my daughter will actually be getting this today 1-11-11 as it is her Birthday! Happy Birthday Amanda I love you!!


Blessings, Jenny

January 4, 2011

BRRRRRR

Chicago Snow
Hello everyone, this is Sheila from Shes A Sassy Lady and I just love when I get the opportunity to come and visit and share with all you Tuesday Treat ladies. I always find it a challenge as there are so many talented ladies that share their designs here!
Well here goes... last month we went to Chicago to visit my daughter and of course it snowed in. Being fairly new to the south we took plenty of photos as our new southern friends just don't realize what real snow does and what the folks up north do to get rid of it. A prime example is shoveling.... if it snows in Alabama, you just leave it and as soon as the sun comes out it disappears, so maybe it lasts a couple of hours. Not so up north, as many of you can attest to so we took photos of the tasks that we what to remember so we never get the urge to go back up there!!!! (Sorry Heather). This is my brother in law Greg busy at hand shoveling the walk before church!

And the plow we saw while driving to Heather's house and it was just so amazing as the whole area was so peaceful and serene just like you read about and see in movies... then out of no where one of these huge plows appear just pushing ans scraping the snow away and making so much noise it actually hurts your ears.... Yup that's what my pages are about... the beauty and the beast of a Chicago Snow!

I hope you enjoy this video, I will show you how I took a layout I did and altered it to fit the photos at hand. I went from floral to frosty, to a blistery wind. Hope you learn a few Gypsy tricks.

This is the yummy paper I chose, it is from My Big Ideas 2009 Christmas papers; I was so excited that I finally go to use this stack.


This second video is actually the third I did but you will find a big mistake in the next video and this one goes over what I did wrong so you don't make the same mistake I did. I am a firm believer that we need to learn from our mistakes! And I am not afraid to share that lesson with you.

This is the white paper I used from the DCWV Glitter stack, I set my blade at 6, pressure high, and speed slow and cut it 2 times.


This is a good video but does show you what I did wrong and also show you how to alter a design.
Before I glue down any of my pieces I really like to just position them and take a good look just in case I need to make an alteration. Sure is easier to do now before gluing.
I used my I rock to attach a little stone to each snowflake. They are so pretty.

Doesn't that look pretty? Those swirls just really remind me of those Chicago winds!
Here is a closeup of the paper and you can see just how beautiful and shimmery it actually is... just like snow.
Isn't this paper Gorgeous?

Here is the right side of the two page spread.
And the two pages together make for a wonderful  keepsake in our scrapbook. Thank you so much for joining me today. I hope you picked up something new that you can use while making your designs.
Thank you for your sweet words of encouragement, your comments continue to inspire me to share with your.
signature