Good afternoon everyone
This is Pam at
The Bug Bytes.
Myamagoo's E sadly died so I am posting today. If she gets hers up and running she will post too.
Something seems to be in the air affecting all Electronics!! Maybe they know they have worked enough and if they give in during Christmas we will replace?
And oops sorry for those subscribed by email. It published accidentally before I finished so posting again.
With me since I keep editing afterwards always a good idea to check my blog for the correct post I guess. :) . I know- but I am the impulsive sort!
Anyway my laptop is also almost toast between the hard drive full, AVG update mess up and the XP update mess. I spent days on it and rolled back XP update and atlast today got my Photoshop working. No videos though. As my Premiere Elements 8 (nor PSE 8) will not open and neither does this laptop recognize my camcorder. So the video I made to post on Friday (for my Sat Bugbytes post) will have to wait till I get my new laptop!
Ok lets get to the project. I made a simple simple wordbook playing with the free cartridges Christmas Solutions. Since I already had the original cartridge I could plug it in my Imagine and use some patterns . But most of the main are paper I just ruffled through my paper stock (not stack but stock :) ) and added.
I had one packet of Christmas stickers I had found at Tuesday Morning and some buttons lying around. So here is what I made. Other materials ink, anna griffin photo punch which I used throughout for the photo mat and Martha Stewart glitter and Diamond Glaze?Glossy Accents to seal in the Glitter and copic markers/sharpie. I have also used liquid paper for texture!
Now I figured ut the rectangle for 6 x 4 photos so I added quarter inch for the mat plus 2 inches -3 inches for sides and in the wider end I added couple of more inches for the punch holes.
Each inside page left side is like a pocket for tags.
Now this is the main gypsy page
I have grouped Christmas(Plantin - thick one - I think creative button 5) and the rectangle and welded. Then I added the punch holes and grouped it in with the rest . Note the weld button on the right - it should show half white as the holes/circles should not be welded.
Now this page I copied across to 8 more pages and then just deleted in each page the rest of the letters ie in 1st page every other letter except C gets deleted. Just click on the letter - after it gets purple - hit delete!
And the way I cut the page
3 times each page! I cut the front pattern paper and then the middle - not with cerealbox/chipboard but with cream/sand color paper.And then the back. I put the pattern side face down for this.I tried flipping but with welds like letters they act strange and do not align up. Make sure that your mat is not too new for this technique as then the paper might get stuck and rip.
Close up
I have added some glass beads and the pattern for the image is from Imagine - Snow Angels.
The charms are buttons. I welded 2010 to each other but not to the wreath not only because I used Imagine for the wreath but I wanted pop. So I just made it bigger.
Now before adding and cutting image in Imagine I sized it in G and noted the size and put the size in Imagine.
Also I set a basic rectangle well inside the punch holes and used this rectangle to size all images/cuts in all the pages.
Inside
Page H
Tree Imagine, Greetings pattern Imagine. Background paper from some stack and mats are 5 x 7 bazill stack. I spent about 20 mins coordinating all colors and arranging them. And the bazill 5 x 7 .I cut it to 6.5 x 4.5. I used the longer strip to paste it down and put the sticker on it. This can be used for adding brief titles or some journalling. The left side as I said is like a pocket for tags. I stuck front pattern paper and middle cream paper and the back of the paper - remember how I put it pattern side down in the cricut mat I put glue to only 3 sides to make a pocket . I also punched a half circle using a circle punch so the tags can easily slide out.
Oh and for the tree I have finally used that Imaginisce whatever you call it bling thingy - iRock. Glenda hope you see this.As promised!!. I have used silver nail heads and colored it in with sharpie/copic!
And the star was a button I had.
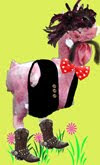
Now page R
See the tag? And the strip in the right is clearly seen here.
The beard I have used liquid paper which gives the arches paper effect. I got it from cheapJoes. This is how we recover some whites in watercolor.But you can also use liquid paper eraser/Corrector whatever!
And yes I have had fun with MS glitters!
The tag I poured some Art Glitter dry clear glue in a paper plate ran the edges through it and sprinkled glitter. Then sealed it in with Glossy Accents. The bow banner I added some glue in spots for bow and flower and then added red glitter then glue to rest and green glitter. Sealed it too with GA.
Then inked some journaling stamp and added lines. Santa - is all cut with cream paper . Shadow is inked in edges with momento dew pads - I think cinnamon something.
Then copic'd
/sharpied and liquid paper. and a pom pom added!
Same story with next pages. On the right I have used stickers or buttons in the title/journal strip (as I like to call it)
Page I
Page S
Same - Buttons stickers and stickles
Page T
Page M
Page A
Some ink to pop up the center and also to inside of Noel to differentiate the letters
Page S
And finally the back.
This tag was sent to me on my birthday from Agnes Flower Disco
So here is the special place for it
So that's my album. Gypsy files up in thebugbytes for both for this and for the card I made for sassy - bevy warm wishes is now up. Look under this
http://www.thebugbytes.com/p/gypsy-files.html