TuesdayTreats – Puts A Little Sass In Your Shopping Bag!
These are the lovely bags from TBBM, below are the same bags filled with gifts, I used the tag from page 32 in our booklet.
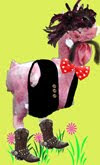
And for those that would like a little something to carry into the office that has plent of Sass try this Alligator inspired bag. Coupled with matching tags this will make a great gift all by itself.
Hello everyone this is Sheila from
ShesASassyLady here with TuesdayTreats featuring TBBM!
Thank you Crystal and Pam (aka MyaMagoo,
Design, Create, Inspire and
TheBugsBytes) for hosting this wonderful blog, designed to share, teach and guide us into getting all we can out of our Gypsy. Thank you also for this opportunity to contribute just a little to this WONDERFUL blog!
I am honored to do this guest appearance knowing just how creative and talented Pam and Crystal are, but I have to admit my knees are still shaking because when I look at the calendar of guest designers I am humbled by the talent…
I was asked to make the bag on page 114. It is a simple little shopping bag. Yet, after spending days wondering why they wanted this little bag I emailed MyaMagoo saying, ‘These bags are soooo little, why would anyone want such a small bag?’
I made the bag as large as I could on a 12x12 sheet and decided it was still too small. After all, what could you use a little bag like this for? Ladies, it’s a shopping bag and if you’re anything like me you want it BIG to fit all your goodies in it! So I enlarged the shopping bag. When you place this cut on your Gypsy it will measure 11.85wx6.17h when it is enlarged. I took it a step further by enlarging the height only to a 7.33h adding a full inch to the bag!
Now we have a bag ready for a little SASS, because I won't carry anything that looks like a plain ol' shopping bag!
This big little bag is a great gift by itself, but you can place many things in it. I chose to make gift tags from TBBM, as for many ladies, that in itself is a wonderful gift. I used the leftover space above the bag and placed a tag within the purse and enlarged it until it fit. The dimensions are 3.97wx4.16h. I then duplicated the tag until I had 3 and lined them up accordingly.
I highlighted 1 tag, tapped the plus sign on upper left corner of screen, then moved to page 2 on my Gypsy Woman, and hit the duplicate button. Resize the tag to fit within the 1st tag 3.63wx3.84h, duplicated until I had 3, and lined them up on the screen. I chose the blackout feature as the holes will not line up properly when making 2 separate sizes. I chose artwork to fit within the tag from GW that I like. Because I was making 4 shopping bags, I chose an additional set of artwork. (Note: I did not use the flower cut that I had planned to).
Here is the material for each bag. All I used was 1 -12x12 sheet of colored paper for the purse and 3 matching tag backs, 2 other sheets or scraps to make tags, ribbon, feathers for the edge and red tape to adhere, pop dots, zip dry glue, buttons or whatever you want to use to embellish, 2 charms (the cat was found on the sidewalk), and lots of rhinestones and skittles.
On the next purse, I used a beaded fiber to Sass up the bag. This is my favorite!
For the faux crocodile/leather bag, again, all I used is 1 - 12x12 sheet or paper, some ribbon, Primas, a brad and red tape to adhere.
Cutting was simple as my first page was all the same color. I did however use a very heavy stock designer paper requiring multiple cuts. I set the blade on 4, pressure med, speed slow and set # of cuts to 3. The cut still didn’t penetrate so I changed blade to 5 and cut 2 more times. Rechecked the paper and then unloaded the mat. Glitter is very hard to cut through so please check before unloading the mat.
On the second page, I used the accent color for the tags and another for the artwork. Again 1 cut. I repeated the cutting steps for 4 purses. After cutting the tags, I decided that I needed to place an actual layer up against the back to cover the back of the decorator paper as it had a peel back look to it. I went back to the 1st page, highlighted the tags, hit the plus and then duplicate button on page 3, allowing for an exact match to the tag. As I made 3 pink purses at the same time, I hit duplicate again, allowing 6 tags to cut at one time.
Below you will see what your score lines look like after cutting. Use these as guides to fold the flaps and adhere your edges on the bag. Because my paper was so thick I scored very lightly on the front and then again on the back of the paper. This allowed for a nice clean fold.
Putting the bag together was very easy. First score at all score lines as shown except for the bottom flap. This gives you a real close look where you will score. See the lines by the bone folder? That is where you will fold your paper.
This is the first purse I scored, and as you can see it is perfectly lined up with the lines they provided. Here is where I am going to change the directions..... Remember I altered the design, yet I did not adjust the score line guides so at this point you need to take out your ruler and score exactly 1" from the base of the purse, which in the photo below would be the line in the center or from the flap score marks. Notice my final flap is larger than the side flap due to the adjustment. You can adjust the sizing, just remember to measure the side score marks and match to that.
After scoring, adhere red tape to your flaps so that it will attach to the inside of the bag. If you are adding decorations use red tape to secure. Make sure that in cutting, you allow enough to tuck ever so slightly into the fold of the bag, being careful that it does not add bulk. Aren't the feathers beautiful?
Be sure to tuck the flap under while matching the side of the bag. Press firmly without crushing. Voilà, you have a bag with plenty of SASS!
You will need to fold the edges as shown. Note, I didn't pull the red tape off and adhere it until after the photo was taken as you will need both hands to make sure your edges are straight. After my bag was put together, I took a very small scissor and cleaned my edges, as the paper I chose left little fuzz balls on the paper that I didn't like.
After completing all 4 bags, I then turned to the tags. After cutting, leave the matching tag to bag as is. The accent tags I ran through the Cuttlebug using my favorite, the paisley folder. Then I put them together using my Glue Glider Pro. Same size to same, back to back, then with the smaller size I positioned a short strip of ribbon and taped it to the back. I then glued the smaller tag onto the larger tag.

Then I decorated my cuts with rhinestones and skittles and used dimensionals to adhere. Needing more goodies on the tags, I used a set of old letter buttons to decorate the first set and liked it so much I went to pick up more just like them. Of course I couldn't remember where I bought them and had already thrown out the tag, and could not find anymore. So I used brads. As you know, I had already put them together so I cut the back of the brad off with wire cutters and used the large glue dots to adhere. As I was making 4 sets I kept them separate by using Ziploc bags and kept them with me to work on whenever I had the chance.
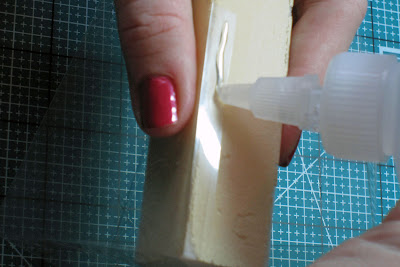
A word of caution on adhesives, if you are using designer paper or ribbon you must at least use the red tape. However, in the brown purse even that would not hold the purse or the ribbon. I stopped at our local scrap store for the first time and met, India at Scrapbook Mania, and she told me about Zip Dry glue. It worked wonders and the brown purse is solid now!
Skittles need to be placed on 1 at a time. Notice the excess glue from the glue dot. I then used my fingernail to push the excess up against the skittle to give the tag a nice clean look.
After deciding how much ribbon you need, measure and cut enough for all the tags you are making.
Adhere the ribbon with tape on the back then use your glue gun to adhere to the tag.
I used left over rhinestones and some that I got on sale (wish) for only 39 cents. I again used the tweezers and applied one at a time. By the time I got to the third set I was using their rows applying 1 strip at a time!
I think the rhinestones add a little Sass! After I embellished the tags, I punched a hole in the top and added matching ribbon.
I hope you enjoyed making this little bag with me. If you would like the FREE Gypsy file just download it from here:
SassyBag and be sure to come by and visit me at
ShesASassyLady!
Thank you for leaving a comment! I love hearing from you and am encouraged by them!